
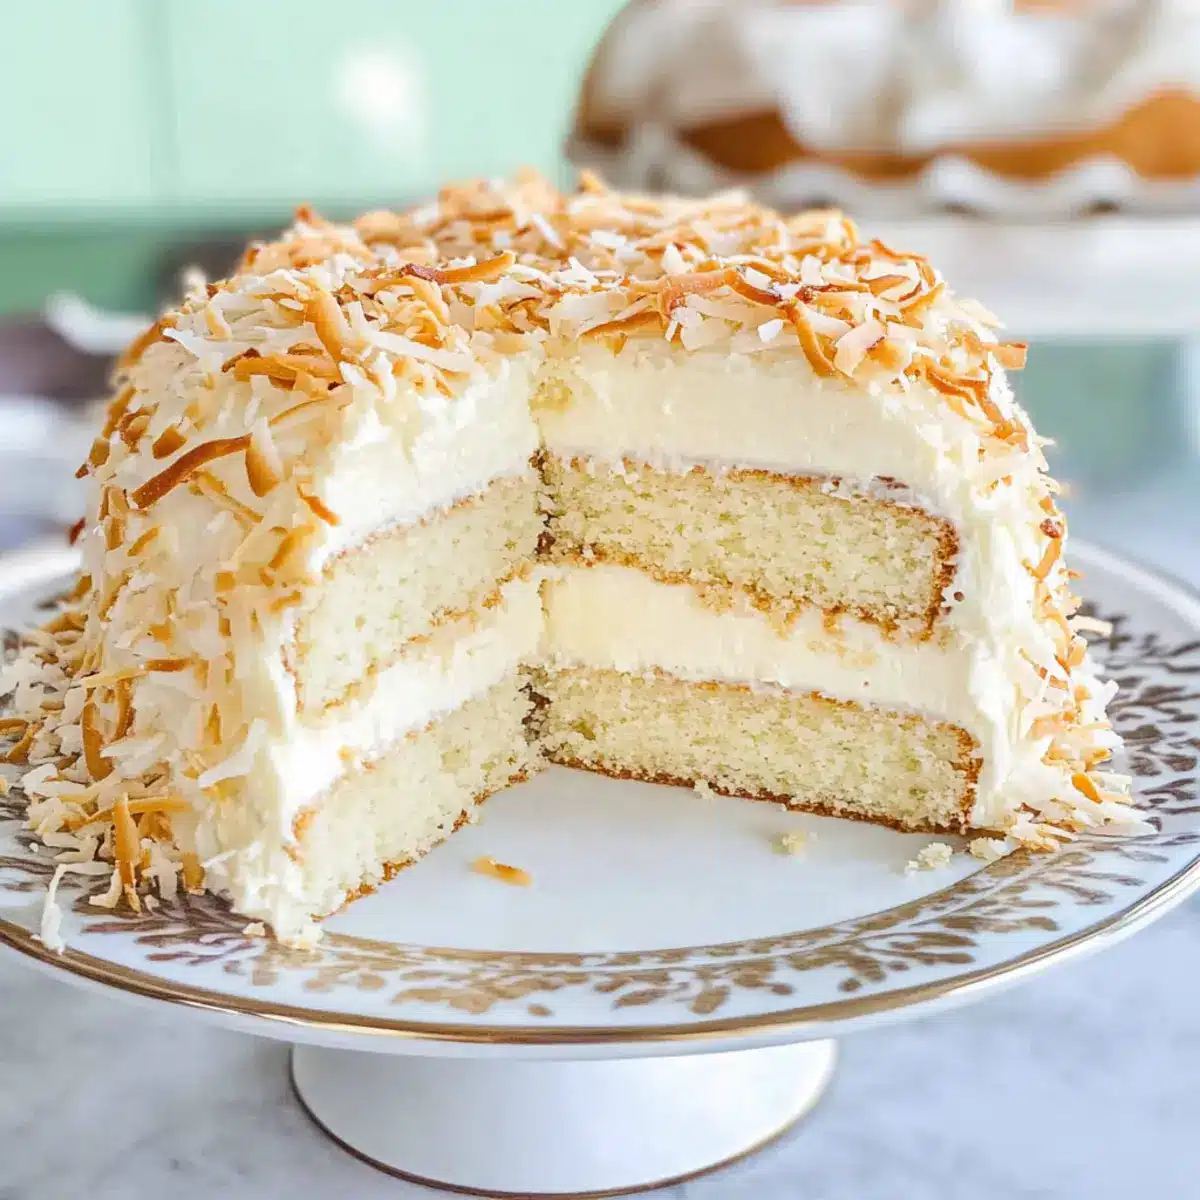
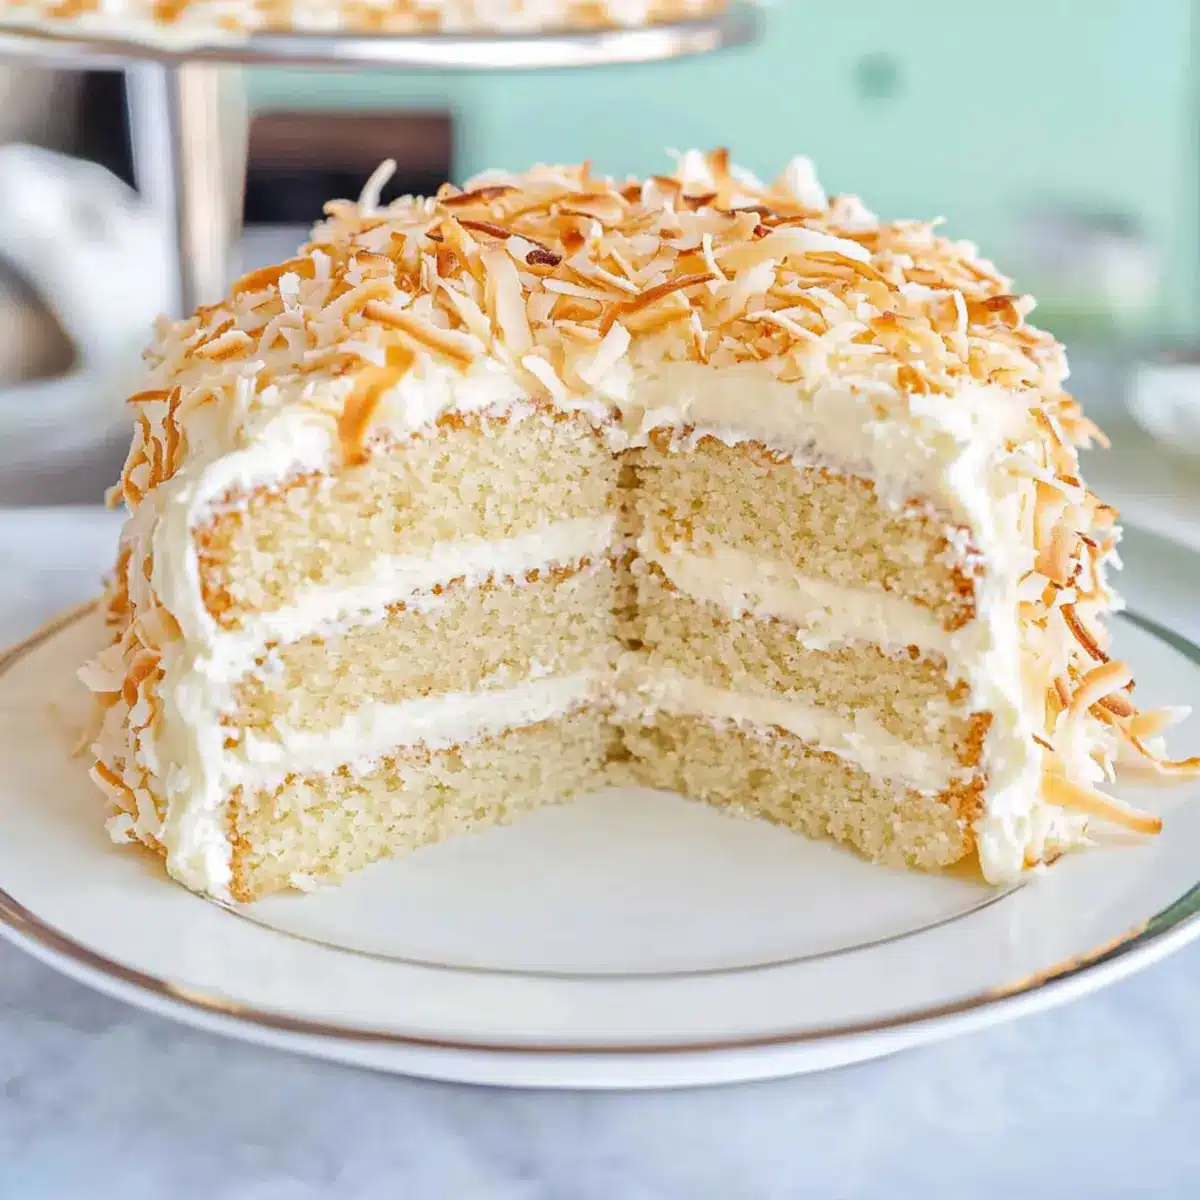
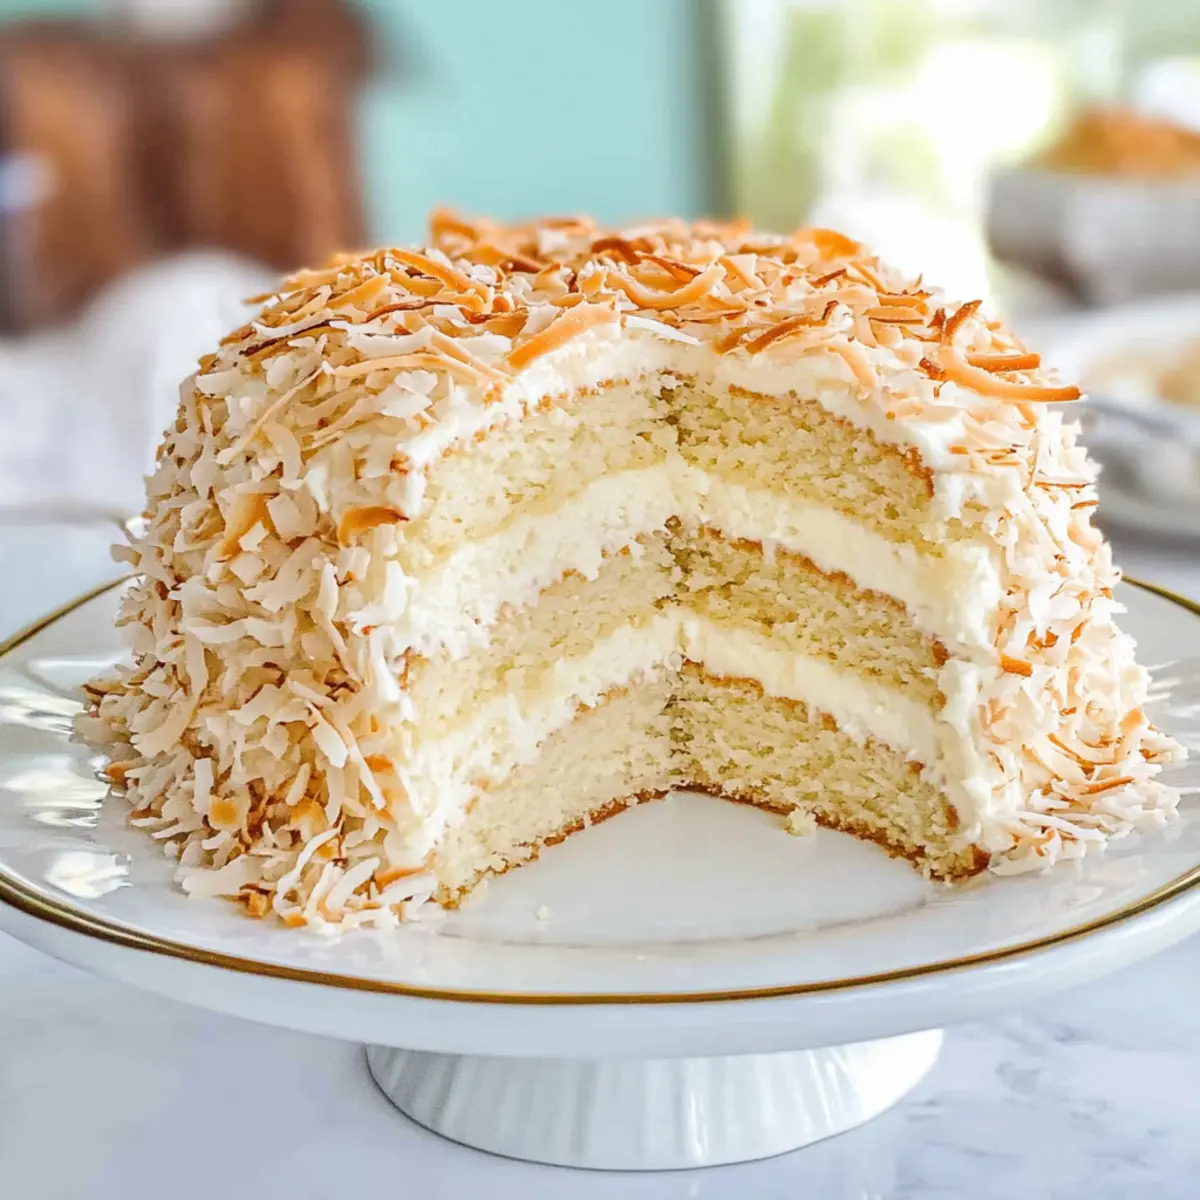
All around me, the sweet aroma of toasted coconut fills the kitchen as I dive into creating a Gluten Free Toasted Coconut Layer Cake. This isn’t just any dessert; it’s an indulgent treat tailored for those special moments when only the best will do. Composed of four moist layers, each infused with homemade coconut syrup and complemented by a creamy coconut custard, this cake is a feast for both the eyes and the palate. Plus, it’s gluten-free, making it a fantastic option for those looking to avoid gluten without sacrificing flavor or texture. Whether you’re celebrating a birthday, an anniversary, or just want to impress friends, this cake is quick to prepare and a guaranteed crowd-pleaser. What’s your favorite way to elevate a simple dessert into a show-stopping centerpiece?
Why is this cake so irresistible?
Decadent Layers: Each slice reveals four plush layers of cake, each enriched with a luscious coconut flavor that will leave your taste buds dancing.
Homemade Goodness: This recipe is crafted from scratch using simple ingredients, offering a homemade charm that you can’t find in store-bought desserts.
Versatile Twists: Whether you’re modifying the frosting or changing up the flavor with a hint of lime zest, this recipe encourages creativity.
Visual Showstopper: The toasted coconut topping elevates this cake, making it not just delicious but also a stunning centerpiece for any gathering.
Quick Prep Time: Despite its impressive appearance, the cake comes together quickly, allowing you to enjoy it without the stress! Pair it with a scoop of coconut ice cream or serve alongside fresh fruit to take it to the next level, just like you would with a Coconut Oatmeal Cookie or Lemon Cheesecake Cake for an unforgettable dessert experience!
Gluten Free Toasted Coconut Layer Cake Ingredients
For the Coconut Custard
- Whole Milk – Moisture base for custard; substitute with any plant-based milk for a dairy-free option.
- Canned Unsweetened Coconut Milk – Adds rich coconut flavor; ensure it’s not sweetened for best results.
- Large Egg Yolks – Provide richness and help set the custard; can try egg substitutes, though not tested.
- Granulated Sugar – Sweetens the custard and cake; can replace with a sugar alternative as needed.
- Cornstarch – Thickens the custard; no substitutes recommended.
- Coconut Rum (Malibu) – Enhances flavor; can be replaced with coconut extract for a non-alcoholic version.
- Vanilla Extract – Adds warm flavor depth; no substitutions necessary.
For the Cake
- Gluten Free All Purpose Flour Blend – Creates structure; a 1:1 baking blend is highly recommended.
- Baking Powder – Essential leavening agent for cake rise.
- Baking Soda – Another leavening agent; ensures the cake rises properly.
- Salt – Enhances flavor and ensures balance.
- Unsalted Butter – Provides moisture and richness; can substitute with vegan butter for dairy-free.
For the Frosting
- Heavy Cream – Used in frosting; alternatives may compromise creaminess.
- Sweetened Flaked Coconut – Adds texture and flavor; can use unsweetened for a less sweet option.
For the Simple Syrup
- Water – Used for making the simple syrup; helps to keep the cake moist.
This delightful Gluten Free Toasted Coconut Layer Cake is the perfect way to celebrate your love for homemade desserts while catering to gluten-free diets!
Step‑by‑Step Instructions for Gluten Free Toasted Coconut Layer Cake
Step 1: Make Coconut Custard
In a medium saucepan over medium heat, combine 1 cup of whole milk and 1 cup of canned unsweetened coconut milk, heating until just steaming but not boiling. While that warms, whisk together 4 large egg yolks, ¾ cup granulated sugar, and ¼ cup cornstarch until smooth. Gradually whisk the warm milk mixture into the egg mixture, return to heat, and stir continuously until thickened (about 5-7 minutes). Remove from heat and mix in 2 tablespoons of coconut rum and 1 teaspoon of vanilla extract. Pour into a bowl, cover, and chill in the refrigerator for at least 2 hours.
Step 2: Prepare Cake Batter
Preheat your oven to 350°F (175°C) and prepare three 9-inch round cake pans by greasing them and lining the bottoms with parchment paper. In a large bowl, whisk together 2 cups of gluten-free all-purpose flour, 1 teaspoon of baking powder, ½ teaspoon of baking soda, and ½ teaspoon of salt. In another bowl, cream 1 cup of unsalted butter with 1½ cups granulated sugar until light and fluffy. Beat in 4 egg whites, and then alternate mixing in the dry ingredients with 1 cup of whole milk and ½ cup of yogurt, beginning and ending with the dry ingredients.
Step 3: Bake the Cake Layers
Divide the cake batter evenly among the prepared pans, smoothing the tops with a spatula. Bake in your preheated oven for 25-30 minutes, or until a toothpick inserted in the center comes out clean, and the edges are lightly golden. Once baked, remove the pans from the oven and let them cool for about 10 minutes in the pans. Then, turn them out onto a wire rack to cool completely.
Step 4: Toast Coconut
While the cakes cool, prepare the toasted coconut. Preheat your oven to 350°F (175°C) if you’ve turned it off. Spread 2 cups of sweetened flaked coconut evenly on a baking sheet. Bake for 5-7 minutes, stirring occasionally, until the coconut is golden brown and fragrant. Keep a close eye to avoid burning, as it can brown quickly. Set aside to cool.
Step 5: Make Coconut Simple Syrup
In a small saucepan, bring ½ cup of water and ½ cup of granulated sugar to a boil. Once boiling, stir in 1 cup of sweetened flaked coconut, then remove from heat. Let it steep for about 15 minutes, then strain the syrup into a bowl and let it cool to room temperature. This coconut simple syrup will add moisture to your Gluten Free Toasted Coconut Layer Cake.
Step 6: Prepare Frosting
For the frosting, beat 1 cup of unsalted butter in a large bowl until creamy and light. Gradually add 3-4 cups of powdered sugar, mixing until well combined. Slowly blend in 1 cup of chilled coconut custard until smooth and fluffy. This creamy frosting will be the perfect topping for your cake layers.
Step 7: Assemble Cake
Once the cake layers are completely cool, use a serrated knife to slice each layer in half horizontally, creating a total of six layers. Place one layer on a serving plate, brush generously with coconut simple syrup, and spread an even layer of coconut custard on top. Repeat with the next layers, frosting each with the creamy frosting, and finish with the last layer.
Step 8: Frost and Decorate
Once assembled, coat the entire cake generously with the remaining frosting. Use a spatula to create a smooth finish or decorative swirls. Finally, generously sprinkle the toasted coconut on top of the frosted cake, allowing some to cascade down the sides for a beautiful presentation. Slice and serve your Gluten Free Toasted Coconut Layer Cake at your next celebration!
Make Ahead Options
Planning ahead is a lifesaver for busy home cooks, and this Gluten Free Toasted Coconut Layer Cake is no exception! You can make the coconut custard up to 24 hours in advance; simply store it in the refrigerator, covered tightly to prevent a skin from forming. The cake layers can also be baked up to 3 days in advance—just wrap them well in plastic wrap and keep them stored at room temperature. For the finishing touch, wait until you’re ready to serve to frost the cake with the coconut icing, as it will ensure the cake remains fresh and delicious. By prepping components ahead of time, you’ll not only save time but also make the assembly process a breeze!
Expert Tips for the Best Gluten Free Toasted Coconut Layer Cake
-
Ingredient Readiness: Make sure all your ingredients are at room temperature. This helps in achieving a smoother batter and better rise for your gluten free toasted coconut layer cake.
-
Chill Custard Properly: Allow adequate chilling time for the coconut custard. If it’s not cold enough, it may not spread smoothly between the layers.
-
Uniform Layers: Use a serrated knife for slicing each cake layer evenly. This ensures uniform stacking and a visually appealing presentation.
-
Frosting Texture: Avoid overbeating the heavy cream in your frosting; stop when soft peaks form to keep it light and fluffy without turning it into butter.
-
Toast Coconut Carefully: Monitor the coconut closely while toasting, as it can go from golden to burnt quickly. A delightful crunch adds a wonderful contrast to the cake’s moistness.
Variations for Gluten Free Toasted Coconut Layer Cake
Get ready to explore mouthwatering twists that will make this delightful cake even more special!
-
Almond Essence: Substitute coconut rum with almond extract for a nutty layer of flavor that beautifully complements the coconut.
-
Zesty Lime: Enhance the frosting with lime zest for an uplifting citrus twist that adds brightness to your cake.
-
Cream Cheese Frosting: For a tangy alternative, swap out the buttercream frosting for a creamy cream cheese frosting, creating a deliciously rich dessert.
-
Fruity Layers: Incorporate layers of crushed pineapple or mango between the cake layers for a tropical fruit burst in every slice.
-
Chocolate Drizzle: Add a dreamy drizzle of chocolate ganache over the top for a decadent finish. The rich cocoa pairs perfectly with the sweetness of the cake.
-
Nutty Crunch: Sprinkle toasted pecans or walnuts between the layers to introduce a delightful crunch that contrasts with the moistness of the cake.
-
Coconut Cream: Substitute part of the heavy cream in the frosting with whipped coconut cream for an ultra-rich, coconut-forward flavor.
-
Spicy Kick: Add a pinch of cayenne pepper to the frosting for a surprising warmth that enhances the sweetness and goes beyond the ordinary.
With options like these, you can make this cake uniquely yours. Don’t forget, a side of fresh fruit or a scoop of coconut ice cream is always a lovely pairing, much like serving it alongside a Christmas Tree Cake macaron for an elegant dessert experience!
How to Store and Freeze Gluten Free Toasted Coconut Layer Cake
Fridge: Keep the cake in an airtight container or tightly wrapped in plastic wrap for up to 3 days to maintain its moisture and flavor.
Freezer: For longer storage, freeze individual slices or the entire cake wrapped in plastic wrap and then aluminum foil for up to 2 months.
Thawing: When ready to enjoy, thaw the cake in the refrigerator overnight. Allow it to come to room temperature before serving for the best texture.
Reheating: If you prefer your cake slightly warm, place a slice in the microwave for about 10-15 seconds, or until just warmed through.
What to Serve with Gluten Free Toasted Coconut Layer Cake
Indulging in a slice of this luscious cake is delightful enough, but pairing it with the right accompaniments can elevate the experience even more.
- Fresh Berries: The tartness of berries like raspberries or strawberries beautifully complements the sweetness of the cake, adding a refreshing contrast.
- Coconut Ice Cream: Creamy and sweet, a scoop of coconut ice cream enhances the tropical flavors, creating a blissful harmony of textures.
- Whipped Cream: A light dollop of whipped cream can soften the richness of the buttercream, offering a delightful, airy balance that brightens every bite.
- Crushed Pineapple: Adding crushed pineapple to your plate brings a juicy tropical twist, perfectly complementing the coconut in the cake.
Elevate dessert time with a side of vibrant fruit salad, bursting with seasonal favorites. The juicy bites offer a refreshing palate cleanser between layers of cake, making each mouthful feel indulgent yet light.
- Coconut Water: For a thirst-quenching option, chilled coconut water brings a light, refreshing taste while echoing the tropical theme.
- Sweet Tea or Iced Coffee: A warm sweet tea balances the flavors of the cake, or for coffee lovers, a smooth iced coffee transforms your dessert into a mini occasion.
- Chocolate Sauce: Drizzling a rich chocolate sauce over each slice adds a touch of decadence, creating a heavenly combination in every forkful!

Gluten Free Toasted Coconut Layer Cake Recipe FAQs
What type of milk should I use for the custard?
I recommend using whole milk for the Coconut Custard, but you can easily substitute it with any plant-based milk for a dairy-free version. Ensure that the milk is unsweetened to keep the flavors balanced.
How should I store the cake after baking?
To keep your Gluten Free Toasted Coconut Layer Cake fresh, store it in an airtight container or tightly wrapped in plastic wrap in the refrigerator for up to 3 days. This will help retain its moisture and flavor.
Can I freeze this cake?
Absolutely! For longer storage, you can freeze the cake either whole or in individual slices. Wrap it tightly in plastic wrap, followed by aluminum foil to prevent freezer burn. It will stay fresh for up to 2 months. When you’re ready to enjoy it, thaw the cake in the refrigerator overnight before bringing it to room temperature.
What should I do if my coconut custard doesn’t thicken?
If your coconut custard doesn’t thicken as expected, it may be because it didn’t cook long enough. Return it to medium heat and stir continuously for a few more minutes until it thickens. If you find it’s still runny, you can whisk a little more cornstarch with water and add it to the custard while heating. Just remember to stir continuously to avoid lumps.
Can I make this recipe nut-free?
Yes! This recipe is already gluten-free, and you can modify it to be nut-free by ensuring all your ingredients are free from cross-contamination. Use coconut milk and flour options that are certified nut-free, and the cake will still turn out deliciously.
Are there any dietary considerations for this cake?
This cake is gluten-free, making it suitable for those with gluten sensitivities. However, if you’re considering allergies, make sure to check the labels on ingredients like coconut milk, granulated sugar, and any extracts you use. For a dairy-free option, you can substitute butters and creams with vegan alternatives. Always double-check for ingredient sources based on individual dietary needs.
Heavenly Gluten Free Toasted Coconut Layer Cake for Celebrations
Ingredients
Equipment
Method
- In a medium saucepan over medium heat, combine 1 cup of whole milk and 1 cup of canned unsweetened coconut milk, heating until just steaming but not boiling. While that warms, whisk together 4 large egg yolks, ¾ cup granulated sugar, and ¼ cup cornstarch until smooth. Gradually whisk the warm milk mixture into the egg mixture, return to heat, and stir continuously until thickened (about 5-7 minutes). Remove from heat and mix in 2 tablespoons of coconut rum and 1 teaspoon of vanilla extract. Pour into a bowl, cover, and chill in the refrigerator for at least 2 hours.
- Preheat your oven to 350°F (175°C) and prepare three 9-inch round cake pans by greasing them and lining the bottoms with parchment paper. In a large bowl, whisk together 2 cups of gluten-free all-purpose flour, 1 teaspoon of baking powder, ½ teaspoon of baking soda, and ½ teaspoon of salt. In another bowl, cream 1 cup of unsalted butter with 1½ cups granulated sugar until light and fluffy. Beat in 4 egg whites, and then alternate mixing in the dry ingredients with 1 cup of whole milk and ½ cup of yogurt, beginning and ending with the dry ingredients.
- Divide the cake batter evenly among the prepared pans, smoothing the tops with a spatula. Bake in your preheated oven for 25-30 minutes, or until a toothpick inserted in the center comes out clean, and the edges are lightly golden. Once baked, remove the pans from the oven and let them cool for about 10 minutes in the pans. Then, turn them out onto a wire rack to cool completely.
- While the cakes cool, prepare the toasted coconut. Preheat your oven to 350°F (175°C) if you’ve turned it off. Spread 2 cups of sweetened flaked coconut evenly on a baking sheet. Bake for 5-7 minutes, stirring occasionally, until the coconut is golden brown and fragrant. Set aside to cool.
- In a small saucepan, bring ½ cup of water and ½ cup of granulated sugar to a boil. Once boiling, stir in 1 cup of sweetened flaked coconut, then remove from heat. Let it steep for about 15 minutes, then strain the syrup into a bowl and let it cool to room temperature.
- For the frosting, beat 1 cup of unsalted butter in a large bowl until creamy and light. Gradually add 3-4 cups of powdered sugar, mixing until well combined. Slowly blend in 1 cup of chilled coconut custard until smooth and fluffy.
- Once the cake layers are completely cool, use a serrated knife to slice each layer in half horizontally, creating a total of six layers. Place one layer on a serving plate, brush generously with coconut simple syrup, and spread an even layer of coconut custard on top. Repeat with the next layers, frosting each with the creamy frosting.
- Once assembled, coat the entire cake generously with the remaining frosting. Use a spatula to create a smooth finish or decorative swirls. Finally, generously sprinkle the toasted coconut on top.
Leave a Reply