
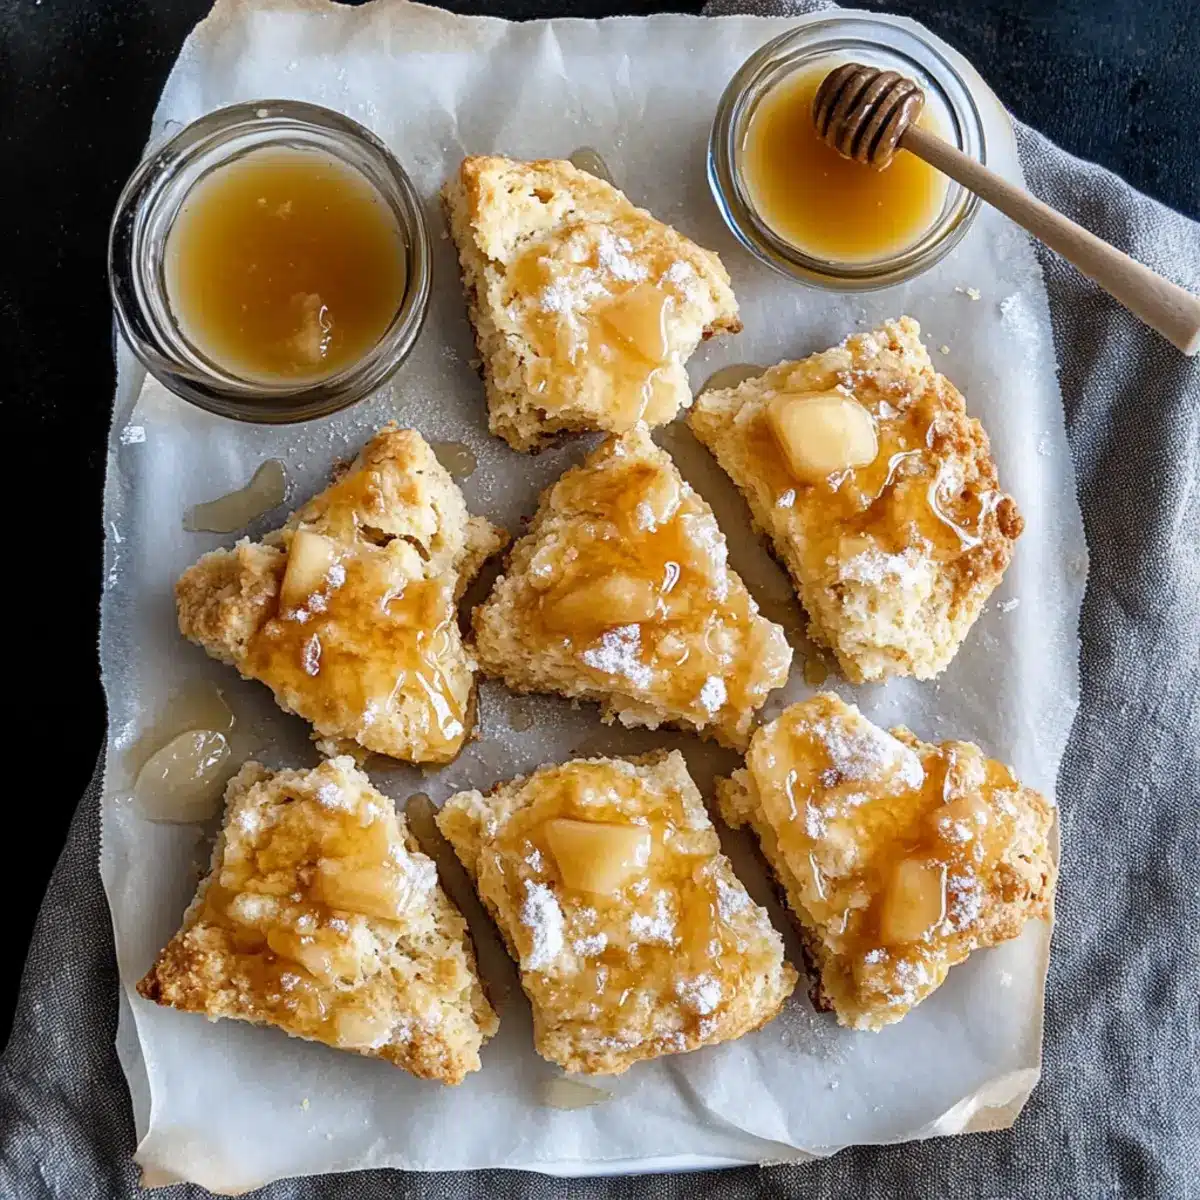
As I wandered through the farmers’ market last weekend, the sweet aroma of roasted pears wafted through the air, instantly sparking my imagination. That enchanting scent inspired me to create Roasted Pear and Vanilla Bean Scones with Salty Honey Glaze, a delightful treat perfect for any time of day. This recipe beautifully pairs the juicy tenderness of roasted pears with the comforting, flaky texture of scones, making it an irresistible option for a cozy breakfast or a lovely afternoon tea. Plus, these scones come together in a snap, so you can impress your guests with minimal fuss. Imagine biting into the warm goodness, with layers of buttery pastry and that delightful hint of salty-sweet glaze—pure bliss! Ready to bring a touch of gourmet baking into your kitchen? Let’s dive in!

Why are these scones a must-try?
Irresistible Flavor: The combination of roasted pears and vanilla creates a sweet, aromatic experience that will leave your taste buds dancing.
Perfect Anytime Treat: These scones are ideal for breakfast, brunch, or an afternoon snack, making them a versatile choice for any occasion.
Quick and Easy: With minimal prep time and simple ingredients, you can whip up this delightful treat in a flash—perfect for busy days!
Crowd-Pleasing Appeal: Serve these warm with a drizzle of salty honey glaze, and watch as they disappear faster than you can say “yum!”
Looking for another fruit-forward delight? Check out my delectable Roasted Sweet Potato salad for a fresh twist!
Roasted Pear and Vanilla Bean Ingredients
• Tip: Gather these simple ingredients to create delectable roasted pear and vanilla bean scones.
For the Scones
- All-purpose Flour – Provides structure; substitute with whole wheat flour for added nutrition.
- Baking Powder – Essential for leavening; ensure it’s fresh for maximum rise.
- Salt – Elevates the flavor; consider using sea salt for a subtler taste.
- Sugar – Adds sweetness; brown sugar can deepen flavor if desired.
- Unsalted Butter – Creates richness and flakiness; swap with vegan butter for a dairy-free treat.
- Vanilla Bean – Infuses aromatic flavor; vanilla extract is a good alternative in a pinch.
- Pears – Adds main flavor and moisture; apples or peaches can be substituted if necessary.
- Heavy Cream – Ensures moisture and richness; milk may be used, but the scones won’t be as decadent.
For the Salty Honey Glaze
- Honey – Sweetens the glaze; maple syrup offers a unique twist.
- Flaky Sea Salt – Adds crunch and enhances the glaze; regular salt works, but texture will differ.
With these delicious ingredients at hand, you’re ready to embark on a baking adventure that will fill your kitchen with mouthwatering aromas, all thanks to the luscious roasted pear and vanilla bean combination! Happy baking!
Step‑by‑Step Instructions for Roasted Pear and Vanilla Bean Scones with Salty Honey Glaze
Step 1: Prep Pears
Preheat your oven to 375°F (190°C). Chop ripe pears into bite-sized chunks and spread them on a baking sheet lined with parchment paper. Roast the pears for about 15-20 minutes, or until they are slightly softened and fragrant. This softening process helps concentrate the sweetness and moisture of the pears, which will beautifully enhance your Roasted Pear and Vanilla Bean scones.
Step 2: Make Dough
In a large mixing bowl, whisk together 2 cups of all-purpose flour, 1 tablespoon of baking powder, 1 teaspoon of salt, and 2 tablespoons of sugar until well combined. Next, cut in 1/2 cup of cold unsalted butter using a pastry cutter or your fingertips until the mixture resembles coarse crumbs. This creates the flaky texture essential for the scones.
Step 3: Add Ingredients
Once your pear chunks have cooled slightly, fold them gently into the flour mixture, along with the scraped seeds of 1 vanilla bean or 1 teaspoon of vanilla extract. Gradually pour in 3/4 cup of heavy cream, mixing until a soft dough forms. Be careful not to overmix, as this will ensure your scones remain tender and flaky.
Step 4: Shape Scones
Turn the dough out onto a lightly floured surface, pressing it gently into a 1-inch thick rectangle. Using a sharp knife or a pastry cutter, slice the dough into triangle shapes. Transfer the scones onto a parchment-lined baking sheet, leaving space between each piece to allow for spreading during baking.
Step 5: Bake
Place the baking sheet in your preheated oven and bake the scones for 20-25 minutes, or until they turn golden brown on the top and slightly firm to the touch. You’ll know they’re done when they give off a delightful aroma and have a lovely golden crust—indicative of delicious Roasted Pear and Vanilla Bean scones.
Step 6: Prepare Glaze
While the scones are baking, prepare the salty honey glaze by whisking together 1/4 cup of honey with a small pinch of flaky sea salt in a small bowl until smooth. This glaze will elevate your scones, adding a sweet and savory touch that perfectly complements the roasted pears and vanilla.
Step 7: Glaze and Cool
Once the scones are baked to perfection, remove them from the oven and let them cool for about 5 minutes on the baking sheet. Drizzle the warm scones with the prepared salty honey glaze, allowing it to soak into the scones slightly. Serve them warm for a delightful treat that’s bursting with flavors of roasted pear and vanilla!

Make Ahead Options
These Roasted Pear and Vanilla Bean Scones are perfect for meal prep enthusiasts looking to save time on busy mornings! You can roast the pear chunks up to 24 hours in advance; simply store them in an airtight container in the refrigerator to maintain their moisture and flavor. Additionally, you can prepare the scone dough and shape it into triangles up to 3 days ahead. Keep the uncooked scones in the fridge, covered with plastic wrap, to ensure they remain fresh. When you’re ready to enjoy these delightful scones, bake them straight from the fridge; just add a couple of extra minutes to the baking time for optimal results, and you’ll have a delicious treat with minimal effort!
Tips for the Best Roasted Pear and Vanilla Bean Scones
-
Don’t Overmix: Keep your scone dough tender by gently folding ingredients together, avoiding overmixing which can lead to tough scones.
-
Cool Pears First: Allow roasted pears to cool before adding them to your dough; this prevents melting the butter and helps maintain flakiness in your roasted pear and vanilla bean scones.
-
Sharp Knife for Cutting: Use a sharp knife to cut the scones for clean edges; this will ensure they bake evenly and look more appealing.
-
Fresh Ingredients Only: Ensure your baking powder is fresh—old leavening agents can hinder the rise, resulting in dense scones.
-
Experiment with Flour: Feel free to swap all-purpose flour for whole wheat flour for a nuttier flavor and extra nutrition, while maintaining the gorgeous texture.
How to Store and Freeze Roasted Pear and Vanilla Bean Scones
Room Temperature: Store scones in an airtight container at room temperature for up to 3 days. Keep them away from direct sunlight to maintain freshness.
Fridge: For longer freshness, refrigerate scones in an airtight container for up to 5 days, though they may lose some flakiness.
Freezer: Freeze the scones for up to 3 months. Wrap each scone individually in plastic wrap and place them in a freezer bag to prevent freezer burn.
Reheating: To enjoy your roasted pear and vanilla bean scones at their best, reheat from frozen in a preheated oven at 350°F (175°C) for about 10-15 minutes, until warm.
Roasted Pear and Vanilla Bean Variations
Feel free to customize your scones to make them your own with these fun and delicious variations!
-
Fruit Swap: Replace roasted pears with roasted apples or apricots for a delightful twist. Each fruit brings its own unique flavor, ensuring your scones remain wonderfully seasonal.
-
Nuts for Crunch: Add chopped walnuts or pecans into the dough for a tasty crunch! The nutty flavor pairs beautifully with the sweetness of the roasted fruit, creating a delightful contrast.
-
Spice it Up: Incorporate cinnamon or nutmeg into the dry ingredients for a warm, aromatic flavor. Just a pinch can leave you feeling cozy and nostalgic!
-
Gluten-Free: Use a 1:1 gluten-free baking blend to make these scones accessible for gluten-sensitive guests. They’ll enjoy the same flaky texture without the gluten.
-
Dairy-Free Delight: Substitute vegan butter and plant-based cream to make this recipe dairy-free. The scones will still be rich and satisfying, so no one will miss the dairy!
-
Citrus Icing: For a refreshing change, replace the salty honey glaze with a zesty lemon icing. Just mix powdered sugar with lemon juice until smooth for a bright finish.
-
Extra Sweetness: Add a handful of mini chocolate chips for a sweet surprise in each bite. It’s a fun way to take your scones to dessert level!
-
Savory Scones: For a unique twist, fold in crumbled feta cheese and fresh herbs like rosemary for a savory scone experience. Perfect as an appetizer or alongside soup!
Don’t forget, these scones are a beautiful treat to serve alongside a warm cup of tea or a refreshing Vanilla Cranberry Crush. Enjoy your cozy baking adventure!
What to Serve with Roasted Pear and Vanilla Bean Scones?
Elevate your scone experience with delightful pairings that complement the sweet, cozy flavors of roasted pears and vanilla.
-
Fresh Fruit Salad: A medley of vibrant berries and citrus provides a refreshing contrast to the sweet scones, making each bite feel bright and lively.
-
Whipped Cream: Light and airy, a dollop of whipped cream adds richness and creaminess, bringing a decadent touch to every mouthful.
-
Hot Tea: Choose a floral or herbal tea, such as chamomile or Earl Grey, for an aromatic warming effect that enhances the comforting flavors of the scones.
-
Cheese Platter: Creamy brie or tangy goat cheese can balance the sweetness of the scones beautifully, creating a delightful savory-sweet experience.
-
Cinnamon Spiced Hot Chocolate: Indulge in a cup of this luscious drink—it’s the perfect cozy companion that complements the nutty undertones of roasted pears.
-
Caramel Sauce: Drizzling homemade or store-bought caramel over the scones offers a rich, buttery sweetness that deepens the dessert experience.
-
Savory Quiche: A slice of quiche with fresh herbs and cheese provides a wonderful contrast, making for a well-rounded brunch spread.
-
Chai Latte: The warming spices in chai contrast with the sweetness of the scones, offering a harmonious blend of flavor and aroma perfect for chilly mornings.
Serve any of these favorites for a complete meal that will enchant your family and leave everyone asking for seconds!

Roasted Pear and Vanilla Bean Scones with Salty Honey Glaze Recipe FAQs
How do I choose the best pears for baking?
Absolutely! Look for pears that are ripe but still firm—this ensures they will hold up well during roasting without becoming mushy. Perfect choices include Bartlett or Bosc pears, which are both sweet and aromatic, providing amazing flavor to your scones.
How should I store leftover scones?
For sure! Place your scones in an airtight container at room temperature for up to 3 days. If you want to keep them fresh longer, consider refrigerating them for up to 5 days, though they might lose a bit of flakiness.
Can I freeze roasted pear and vanilla bean scones?
Yes! To freeze, wrap each scone in plastic wrap and store them in a freezer bag to prevent freezer burn. They will maintain their best quality for up to 3 months. When you’re ready to enjoy them, reheat from frozen in a preheated oven at 350°F (175°C) for about 10-15 minutes until warm and delightful.
What can I do if my scones turned out dense?
Very common! If your scones are dense, double-check that your baking powder was fresh and that you didn’t overmix the dough. Gently fold the ingredients just until combined; overmixing can lead to tough scones. Next time, try using cold ingredients for the butter and cream to help keep that lovely, flaky texture.
Can I make these scones dairy-free?
Yes, you can! Substitute the unsalted butter with a high-quality vegan butter, and use plant-based heavy cream or almond milk instead. These swaps will still allow you to enjoy the delightful flavor of roasted pear and vanilla without the dairy.
How long does the glaze last, and how can I store it?
Absolutely! The salty honey glaze can be stored in an airtight container in the refrigerator for up to 1 week. Just give it a good stir to recombine before drizzling over your scones. It’s an easy way to elevate other baked goods too!
Roasted Pear and Vanilla Bean Scones with a Sweet Surprise
Ingredients
Equipment
Method
- Preheat your oven to 375°F (190°C). Chop pears and roast for about 15-20 minutes.
- In a large mixing bowl, whisk together flour, baking powder, salt, and sugar. Cut in butter until the mixture resembles coarse crumbs.
- Fold in the cooled pears and vanilla seeds or extract. Gradually pour in cream and mix until a soft dough forms.
- Turn dough onto a floured surface, shape into a 1-inch thick rectangle, and cut into triangle shapes.
- Place on a parchment-lined baking sheet and bake for 20-25 minutes until golden brown.
- While baking, whisk together honey and flaky sea salt for the glaze.
- After baking, cool for 5 minutes and drizzle scones with salty honey glaze before serving.
Leave a Reply