
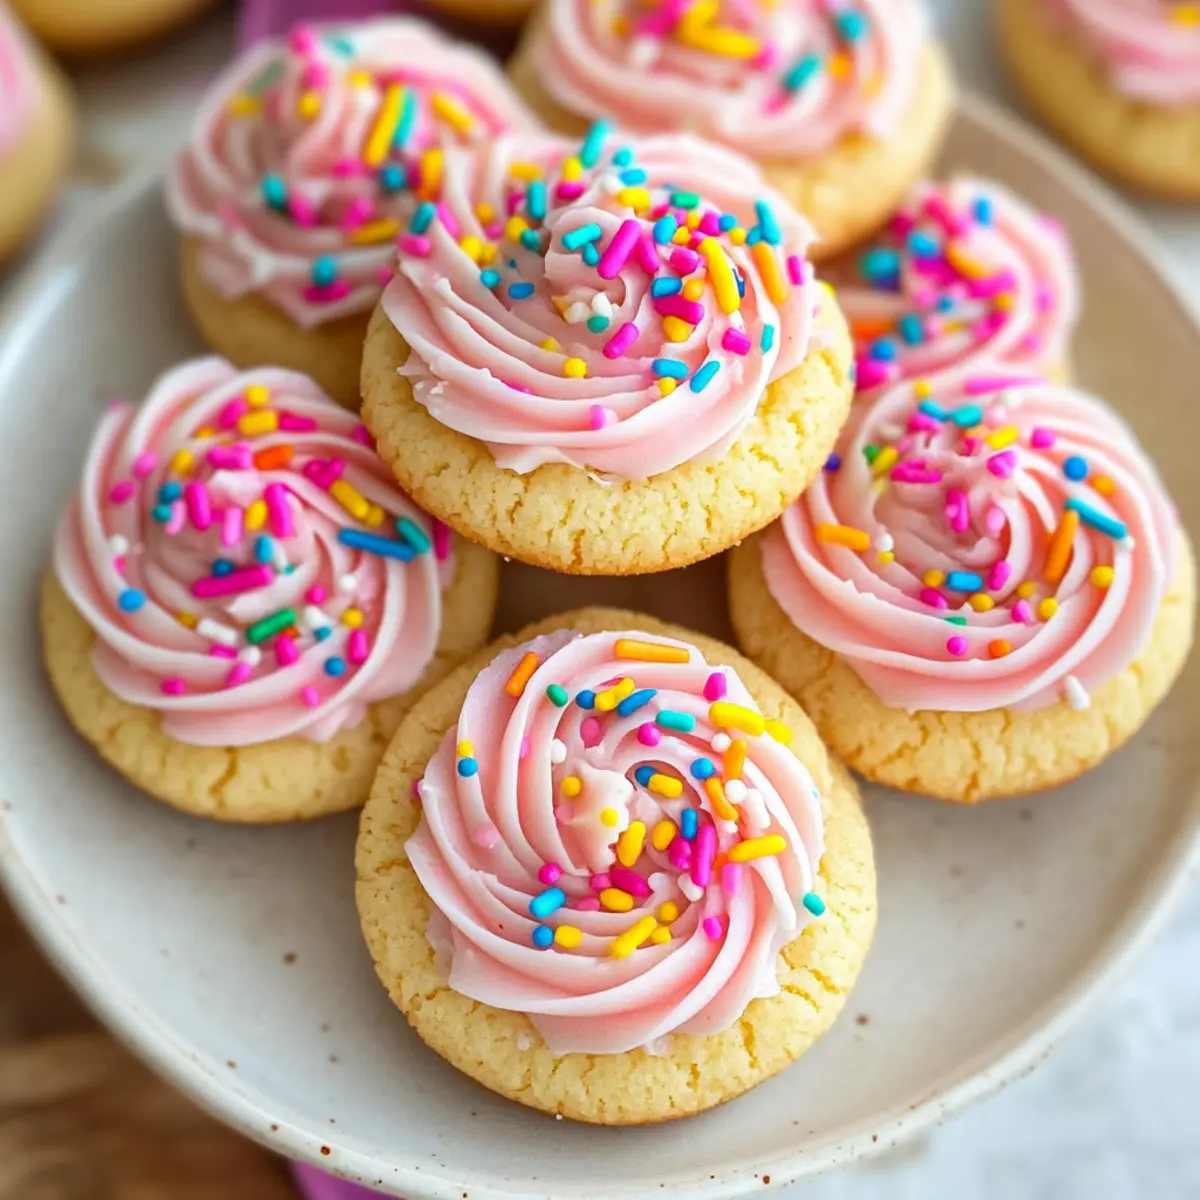
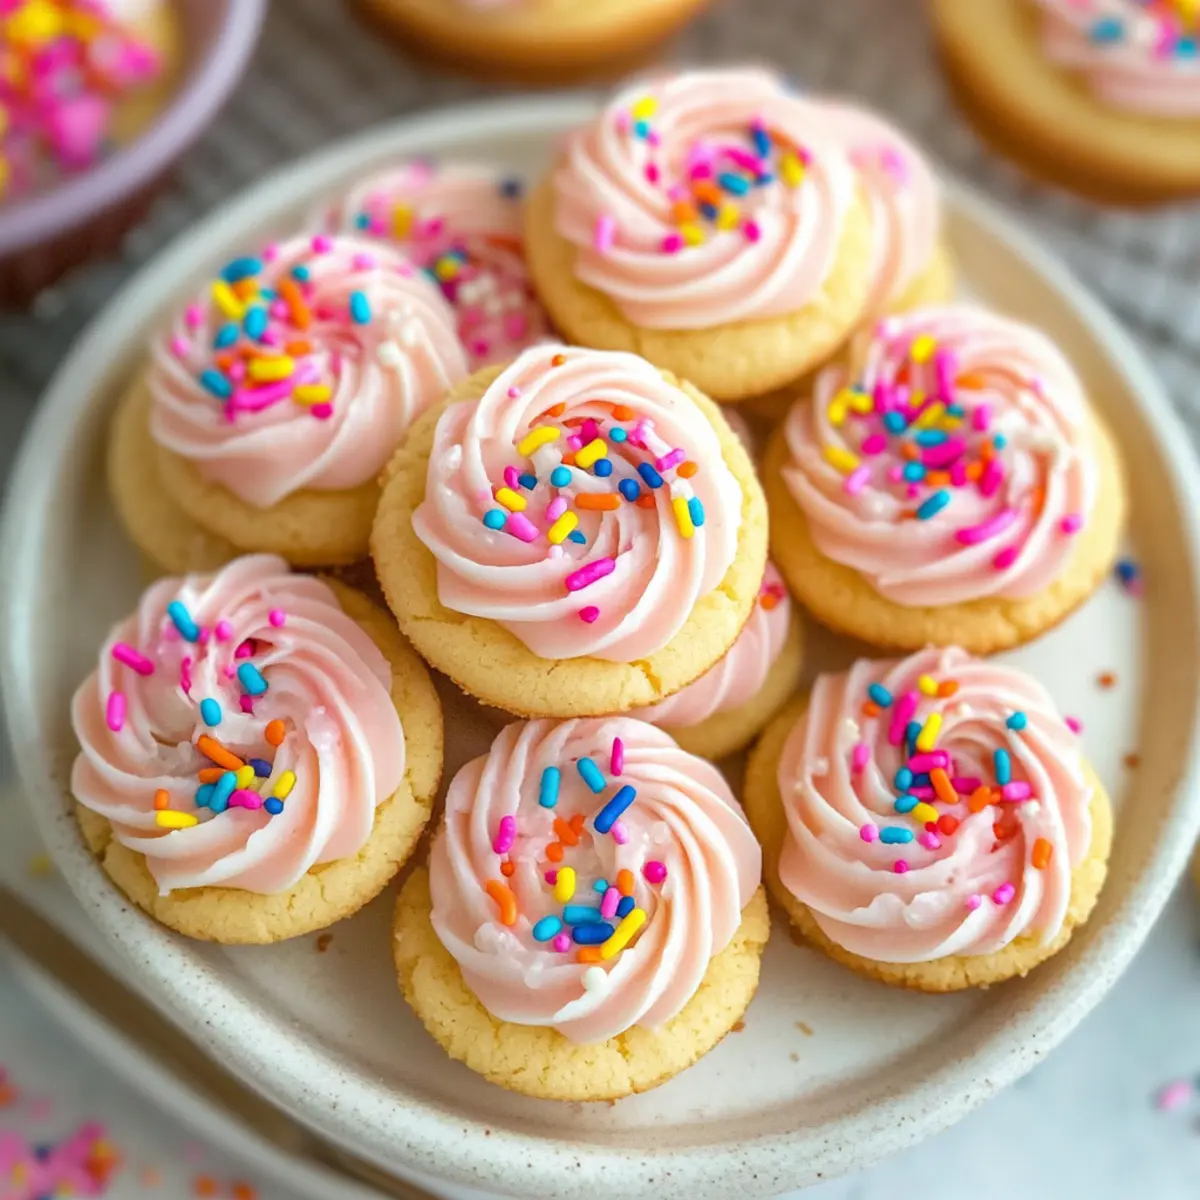
As I sifted through countless recipes, I stumbled upon something that instantly sparked my excitement: adorable Sugar Cookie Cups! These delightful little desserts are not just a feast for the eyes; they’re also incredibly versatile and perfect for any occasion. Picture this—each cookie cup features a chewy sugar cookie base cradling a swirl of creamy cream cheese buttercream frosting, and they can be made ahead of time, making them a convenient option for busy hosts. Plus, with endless possibilities for decoration and flavor, from holiday-themed sprinkles to exciting frosting variations, everyone will find a reason to adore them. Are you ready to create a sweet masterpiece that’s sure to impress? Let’s dive into making these delightful treats together!
Why Are Sugar Cookie Cups So Special?
Versatile Treat: These Sugar Cookie Cups are incredibly adaptable, allowing you to customize with any frosting or toppings you desire. Whether it’s holiday celebrations or everyday treats, they fit any occasion perfectly!
Easy to Make: The straightforward process means even novice bakers can create these charming desserts without stress.
Portable Goodness: Their cup shape is not only delightful but also makes them easy to transport—ideal for parties or gifts!
Make-Ahead Friendly: Prepare them in advance and fill with frosting just before serving. That way, you’ll have more time to enjoy your guests!
Decadent Flavor: The combination of buttery cookie and rich cream cheese frosting is simply irresistible, bringing joy to every bite.
Whether you’re hosting a festive gathering or just looking for a sweet treat, these cookie cups will surely be a hit alongside other favorites like Sugarplum Cranberry Cookies or Coconut Oatmeal Cookies!
Sugar Cookie Cups Ingredients
For the Cookie Cups
• All-purpose flour – Provides structure and texture; spoon and level for accuracy.
• Baking soda and baking powder – Act as leavening agents for optimal rise.
• Salted butter (3/4 cup) – Adds flavor and moisture; substitute with unsalted butter plus 1/4 teaspoon salt for balance.
• Granulated sugar (3/4 cup) – Your primary sweetener, giving that chewy cookie texture.
• Vanilla extract (1 1/2 teaspoons) – Enhances overall flavor; consider vanilla bean extract as an exciting substitute.
• Almond extract (1/2 teaspoon) – Deepens the sugar cookie flavor profile pleasantly.
• Large egg (1) – Binds everything together; room temperature is best for consistency.
For the Cream Cheese Buttercream Frosting
• Cream cheese (2 ounces) – Provides a rich, creamy base; softening is key for mixing.
• Powdered sugar (3 cups) – Sweetness in its fluffiest form; sifting helps avoid clumps.
• Butter (1/4 cup) – Adds rich flavor; ensure it’s at room temperature for easy blending.
• Milk (2 tablespoons) – Adjusts consistency of the frosting; use more for a lighter texture.
• Vanilla extract (1/4 teaspoon) – Adds a sweet aroma; can be replaced with any favorite extract.
• Optional food coloring – Great for festive touches; add gradually until desired hue is reached.
For Decoration
• Sprinkles – Perfect for a pop of color; seasonal colors can elevate any occasion.
Now that you have everything you need, let’s get baking! Your Sugar Cookie Cups are going to be a delightful addition to any gathering.
Step‑by‑Step Instructions for Sugar Cookie Cups
Step 1: Preheat and Prepare
Begin by preheating your oven to 350°F (175°C). While the oven warms, take two regular muffin pans and lightly grease them with cooking spray or butter. This will ensure that your Sugar Cookie Cups come out easily after baking. Set the greased pans aside, ready for the dough to be pressed in.
Step 2: Cream Butter and Sugar
In a large mixing bowl, combine 3/4 cup of softened salted butter with 3/4 cup of granulated sugar. Using an electric mixer, beat the mixture on medium speed until it becomes light and fluffy, approximately 3-4 minutes. This step is crucial for achieving the perfect texture in your Sugar Cookie Cups.
Step 3: Incorporate Wet Ingredients
Add one large egg, 1 1/2 teaspoons of vanilla extract, and 1/2 teaspoon of almond extract to the butter-sugar mixture. Mix on low speed until everything is smoothly combined, ensuring no lumps remain. This blend will infuse your cookie cups with delightful flavors, setting the foundation for your delicious treats.
Step 4: Mix Dry Ingredients
In another bowl, whisk together 2 cups of all-purpose flour, 1 teaspoon of baking powder, and 1/2 teaspoon of baking soda. Gradually add this dry mixture to the wet ingredients while mixing on low speed. Be careful not to over-mix; just blend until a soft dough forms that holds together beautifully.
Step 5: Shape the Dough
Now it’s time to form the Sugar Cookie Cups! Using about 2 tablespoons of dough for each cup, press the mixture evenly into the bottom and halfway up the sides of each muffin cup. Make sure the dough is compact. This will create the perfect structure for holding your frosting later on.
Step 6: Bake the Cookie Cups
Place the muffin pans in your preheated oven and bake for approximately 12 minutes, or until the tops are lightly golden brown. Keep a close eye on them; they should be soft to the touch but firm enough to hold their shape when removed.
Step 7: Cool and Shape the Cups
Once baked, remove the pans from the oven and let them cool for about 15 minutes. After they have cooled slightly, use a small spoon to gently press down in the center of each cookie cup, creating a small well for the frosting. Allow them to cool completely before frosting.
Step 8: Make the Cream Cheese Frosting
In a mixing bowl, beat together 2 ounces of softened cream cheese and 1/4 cup of room temperature butter until creamy and smooth. Gradually add 3 cups of powdered sugar, 1/4 teaspoon vanilla extract, and 2 tablespoons of milk. Mix until the frosting reaches your desired consistency—fluffy and spreadable for your Sugar Cookie Cups.
Step 9: Frost and Decorate
With your cooled cookie cups ready, use a piping bag or a spoon to generously fill each cup with the cream cheese frosting. Get creative with the frosting, swirling it high or keeping it flat. Finally, add a sprinkle of colorful decorations on top to add that perfect festive touch. Enjoy the delightful sweetness!
Make Ahead Options
These adorable Sugar Cookie Cups are perfect for meal prep, allowing busy home cooks to save time on those hectic days! You can prepare the cookie cups up to 1-2 days in advance by baking them and letting them cool completely before storing them in an airtight container at room temperature. To maintain their delightful texture, ensure they are cooled fully to prevent moisture buildup. On the day of serving, make the cream cheese buttercream frosting (which can also be prepared up to 24 hours ahead and stored in the fridge) and fill the cooled cookie cups just before your guests arrive. This way, you’ll have a stunning dessert that tastes just as delicious as if it were freshly made, all with minimal effort!
What to Serve with Adorable Sugar Cookie Cups?
There’s nothing quite like a delightful dessert spread to make your gathering memorable and inviting.
-
Festive Fruit Salad: Bright and fresh, a fruit salad offers a refreshing contrast to the sweetness of the sugar cookie cups. Consider using seasonal fruits to match any occasion!
-
Creamy Vanilla Ice Cream: Rich, cold ice cream pairs beautifully with the warm, chewy cookie cups. A scoop on the side adds a delightful texture and temperature contrast, making every bite extraordinary.
-
Chocolate Dipped Strawberries: These elegant treats add a touch of luxury to your dessert table. The luscious chocolate complements the sweetness of the sugar cookies perfectly.
-
Hot Cocoa or Chocolate Milk: Warm beverages provide a cozy touch to your dessert experience. The rich flavors of cocoa harmonize with the cookie cups’ sweetness making for a comforting pairing.
-
Cheesecake Bites: Serve mini cheesecake bites alongside for a delightful variety. The rich, creamy bite enhances the sweet cookie cups while offering that quintessential cheesecake flavor.
-
Festive Spritz Cookies: Create a lovely cookie platter by adding spritz cookies. Their buttery texture and light sweetness create a harmonious theme with your sugar cookie cups.
Elevate your dessert time by combining these scrumptious choices alongside your adorable sugar cookie cups!
Sugar Cookie Cups Variations & Substitutions
Feel free to customize these delightful Sugar Cookie Cups with your own creative twists and tastes!
-
Frosting Variations: Swap out the cream cheese buttercream for your favorite flavors like vanilla, chocolate, or even fun strawberry frosting. Get adventurous and mix in some crushed berries for added zing!
-
Gluten-Free Option: Use gluten-free flour to ensure everyone can enjoy these treats without compromising on flavor or texture. Your cookie cups will still shine!
-
Topping Variations: Instead of traditional sprinkles, think outside the box! You could sprinkle on crushed cookies, graham cracker crust, or even fill them with lemon curd for a refreshing change. Tantalize your guests’ taste buds with endless possibilities.
-
Flavor Add-Ins: For an extra burst of deliciousness, incorporate lemon zest into the batter to add a citrusy sparkle, or fold in mini chocolate chips for a sweet surprise in every bite.
-
Nutty Twist: Add finely chopped nuts like pecans or walnuts to the dough for a delightful crunch. This adds texture and a hint of warmth that perfectly complements the sweetness.
-
Dairy-Free Option: Use coconut cream or a plant-based butter alternative to make a dairy-free buttercream frosting. Your cookie cups will still be rich and creamy while being more inclusive!
-
Extra Moisture: Consider adding a tablespoon of sour cream or yogurt to the cookie dough. It adds moisture and a subtle tang that enhances the overall flavor profile of your cookie cups.
-
Spiced Delight: Infuse the cookie dough with warm spices like cinnamon or nutmeg for a festive touch, especially delightful during the holiday season. This will transport your taste buds to cozy winter nights!
No matter how you choose to customize your Sugar Cookie Cups, there’s always an exciting way to make them your own. Pair them with a delightful treat like Raspberry Swirl Cookies with Butter Shortbread or Cranberry Orange Shortbread Cookies for a sweet dessert platter that will impress your guests!
How to Store and Freeze Sugar Cookie Cups
Room Temperature: Store your Sugar Cookie Cups in an airtight container at room temperature for up to 3 days to maintain freshness and texture.
Fridge: If you’d like to enjoy them longer, refrigerate the cookie cups for up to a week in an airtight container. Just let them come to room temperature before serving.
Freezer: For extended storage, freeze the undecorated cookie cups for up to 2 months. Thaw overnight in the fridge, then frost before serving.
Reheating: If you prefer warm treats, reheat the cookie cups in the oven at 350°F for about 5 minutes. This will soften them slightly and bring back that fresh-baked goodness!
Expert Tips for Sugar Cookie Cups
Room Temperature Ingredients: Ensure all your ingredients, especially butter and eggs, are at room temperature for the best mixing and texture.
Don’t Over-Mix: When combining the dry ingredients with the wet, mix just until combined. Over-mixing can lead to tough cookie cups.
Cool Before Frosting: Allow the cookie cups to cool completely before adding the frosting to prevent it from melting and losing shape.
Use Accurate Measurements: For the best results in your Sugar Cookie Cups, measure your flour correctly by spooning and leveling it in the measuring cup.
Get Creative with Toppings: Experiment with different frosting flavors or decorative toppings like crushed cookies and seasonal sprinkles to make your treats unique.
Make Ahead: Prepare your cookie cups a day in advance and fill them with frosting just before serving for maximum freshness without the rush.
Sugar Cookie Cups Recipe FAQs
How do I choose the best ingredients for my Sugar Cookie Cups?
Absolutely! For the best Sugar Cookie Cups, use room temperature ingredients. Make sure your flour is fresh—scoop it up and level it for precise measurements. Your butter should be softened, and I always recommend unsalted butter, giving you control over the salt in your recipe.
How should I store my Sugar Cookie Cups?
Very! To keep your Sugar Cookie Cups fresh, store them in an airtight container at room temperature for up to 3 days. If you want to extend their life, refrigerate them for up to a week. Just remember to let them come back to room temperature for the best taste!
Can I freeze Sugar Cookie Cups, and if so, how?
Of course! Freezing is a great way to enjoy your Sugar Cookie Cups at a later date. First, make sure they’re completely cooled. Then, place the undecorated cookie cups in an airtight container or freezer bag and freeze them for up to 2 months. When you’re ready to enjoy, simply thaw them overnight in the fridge and frost them before serving.
What should I do if my cookie cups are too soft after baking?
A common concern! If your Sugar Cookie Cups are too soft, ensure they are baked until lightly golden brown, about 12 minutes. If they’re still too soft, allow them to cool in the pan for longer before shaping them. You can also try baking them a minute or two longer on your next attempt—just keep an eye on them!
Are there any dietary considerations I should be aware of?
Absolutely! If you’re catering to guests with dietary restrictions, you can easily make gluten-free Sugar Cookie Cups by substituting all-purpose flour with a gluten-free blend. For those with dairy allergies, consider making a dairy-free frosting using plant-based cream cheese and butter. Just be sure to double-check all ingredient labels for potential allergens.
How can I customize the flavors of my Sugar Cookie Cups?
The more the merrier! You can switch up the flavors by incorporating other extracts, like coconut or peppermint. For a fruity twist, try adding lemon zest to the cookie dough or mixing in mini chocolate chips. Let your creativity shine with toppings too—switch the frosting for chocolate or peanut butter, or use crushed candies for a festive touch!
Irresistible Sugar Cookie Cups Filled with Creamy Frosting
Ingredients
Equipment
Method
- Preheat your oven to 350°F (175°C) and grease muffin pans.
- In a bowl, cream together the softened butter and granulated sugar until light and fluffy.
- Add the egg, vanilla extract, and almond extract, and mix until combined.
- In another bowl, whisk flour, baking powder, and baking soda together, then gradually mix into wet ingredients until combined.
- Press about 2 tablespoons of dough into each muffin cup, covering the bottom and sides.
- Bake for about 12 minutes or until golden brown.
- Cool for 15 minutes then press down in the center of each cookie cup to create a well.
- Beat cream cheese and butter, add powdered sugar, vanilla, and milk until desired consistency is reached.
- Fill each cooled cookie cup with frosting and decorate with sprinkles.
Leave a Reply