
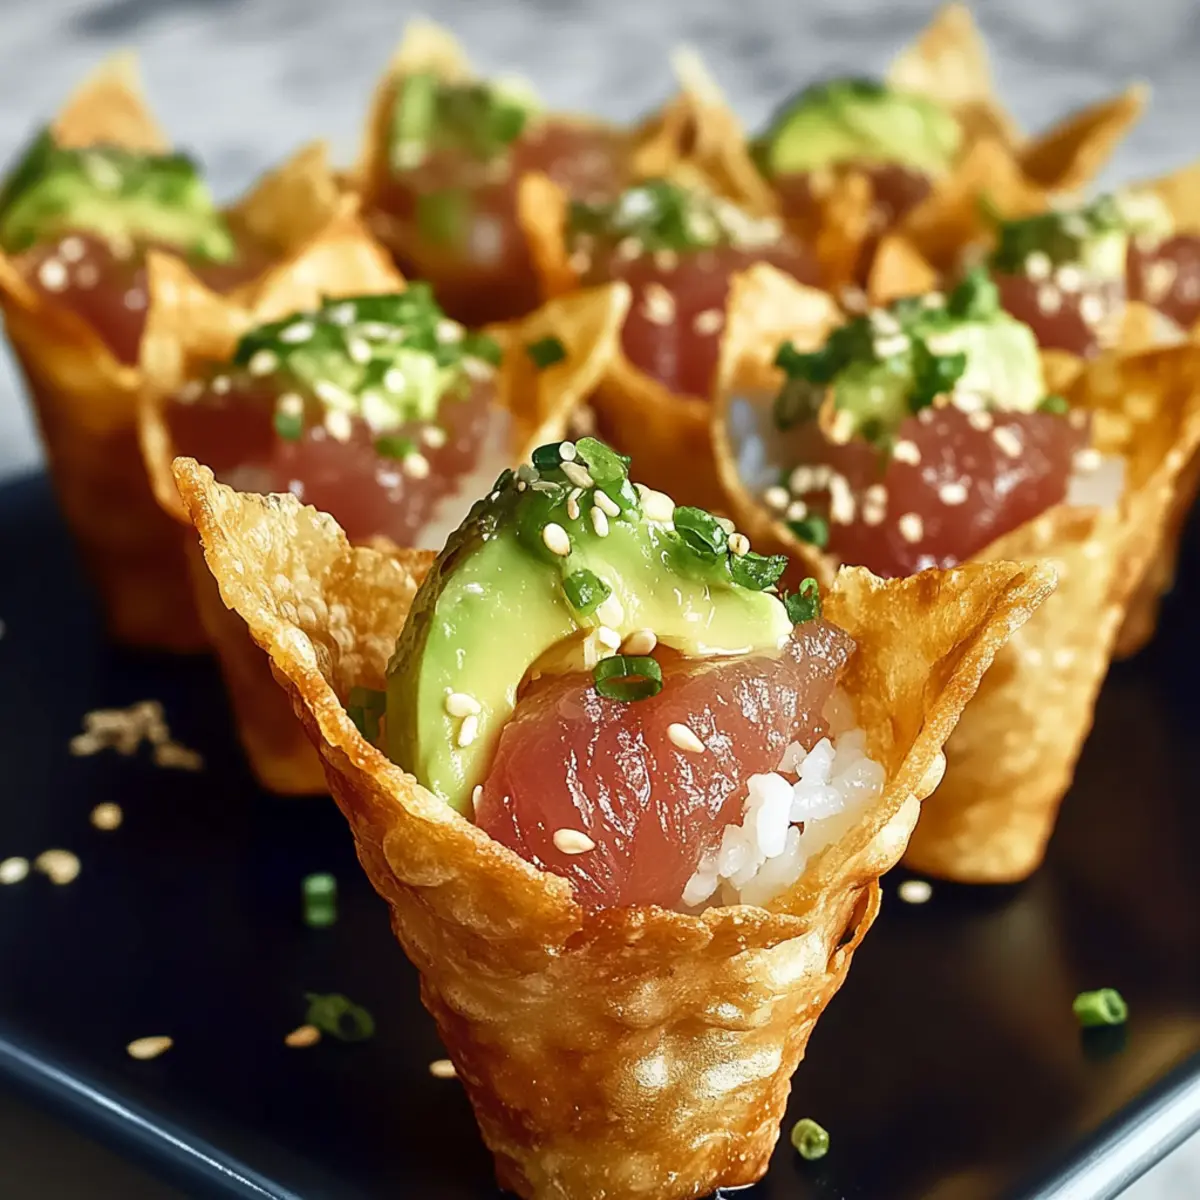
As I picked up the last piece of sushi from my plate, inspiration struck. What if I could combine the joy of sushi with the playful crunch of a wonton? Enter my Creative Sushi Wonton Cones—handheld appetizers that make indulging in your favorite sushi flavors both fun and easy. The best part? They’re customizable to suit any taste and perfect for gatherings, keeping everyone satisfied without the hassle of traditional sushi rolling. With a crispy exterior and a creamy filling made of fresh avocado and sushi-grade tuna, these cones are a delightful balance of textures that you’ll want to whip up again and again. Curious to learn how to craft these scrumptious bites? Let’s dive into the recipe!
Why Are These Sushi Wonton Cones Special?
Unique Presentation: These cones offer a fun twist on traditional sushi, making them a standout at any gathering.
Easy to Customize: Fill them with your favorite ingredients, from sushi-grade tuna to flavorful veggies, catering to every palate and dietary preference.
Crunchy and Creamy: Enjoy the delightful contrast of the crispy wonton shell against the creamy avocado and savory fillings, creating a mouthwatering experience.
Quick to Make: With simple ingredients and just a few steps, you can whip these up in no time—a perfect solution for last-minute gatherings!
Impressive Dazzle: Whether you serve them upright in mini muffin tins or elegantly arranged on a platter, these cones will wow your guests and elevate your entertaining game.
Ready to impress? Check out these serving suggestions to make your presentation shine!
Creative Sushi Wonton Cones Ingredients
• Get ready to craft these delicious bites!
For the Wontons
- Wonton wrappers – These provide the crispy shell; rice paper can be used for a gluten-free option.
- Coconut oil (for frying) – Creates the perfect crunch; you can opt for vegetable oil for a milder flavor.
For the Sushi Rice
- Sushi rice (short-grain, sticky) – This is the heart of your cones; quinoa can be a unique alternative if you adjust the cooking time.
- Rice vinegar – Enhances the flavor; white vinegar is a good substitute, but may slightly alter the taste.
- Sugar – Adds a touch of sweetness; feel free to use brown sugar for a bit more depth.
- Salt – Balances out all flavors; low-sodium salt is an option for health-conscious cooks.
For the Filling
- Avocado – Provides a lovely creaminess; silken tofu can replace it for a vegan treat.
- Tuna steak (sushi-grade) – The star protein of your recipe; consider salmon or cooked shrimp for variation.
- Kewpie mayonnaise – Adds a signature umami flavor; regular mayo works if you’re in a pinch.
- Tomato ketchup or sauce – Brings acidity and sweetness; switch it out for sriracha if you prefer some heat.
- Sriracha (optional) – For an extra kick; you can use any hot sauce that tickles your fancy.
- Lime zest – Infuses brightness; lemon zest will work too if that’s what you have on hand.
- Furikake or black sesame seeds – These make for a flavorful and beautiful garnish; use toasted sesame seeds if unavailable.
Looking to create a unique appetizer? Try these Creative Sushi Wonton Cones for your next gathering!
Step‑by‑Step Instructions for Creative Sushi Wonton Cones
Step 1: Prepare Wonton Cones
Start by preheating your oven to 175 °C (350 °F). Take wonton wrappers and gently wrap them around cream horn molds, ensuring you seal the edges with a little water. This will create your cone-shaped base. Arrange them on a baking sheet while you prepare for frying, so they’re ready to crisp up beautifully in just a moment.
Step 2: Fry Cones
In a deep pan or a heavy skillet, heat enough coconut oil to submerge the cones, ideally around 350 °F (175 °C). Once the oil is bubbling, carefully add the wonton cones. Fry them for 2-3 minutes until they turn golden brown and crispy, watching closely to avoid burning. Once done, remove them and place on paper towels to drain excess oil and cool.
Step 3: Make Sushi Rice
While the cones are frying, prepare the sushi rice. In a pot, cook short-grain sushi rice according to package instructions until sticky. Once cooked, transfer to a large bowl and gently mix in rice vinegar, sugar, and salt while the rice is still warm. Allow the seasoned sushi rice to cool to room temperature, ensuring it remains sticky and ready for assembly.
Step 4: Prepare Tuna Mixture
Chill the sushi-grade tuna steak in the refrigerator while the rice cools. Once ready, either flake or cube the tuna and mix it in a bowl with Kewpie mayonnaise, tomato sauce, sriracha (if desired), and a sprinkle of lime zest. Taste and adjust flavors as necessary—you want a creamy, tangy filling to complement the savory elements of your Creative Sushi Wonton Cones.
Step 5: Assemble Cones
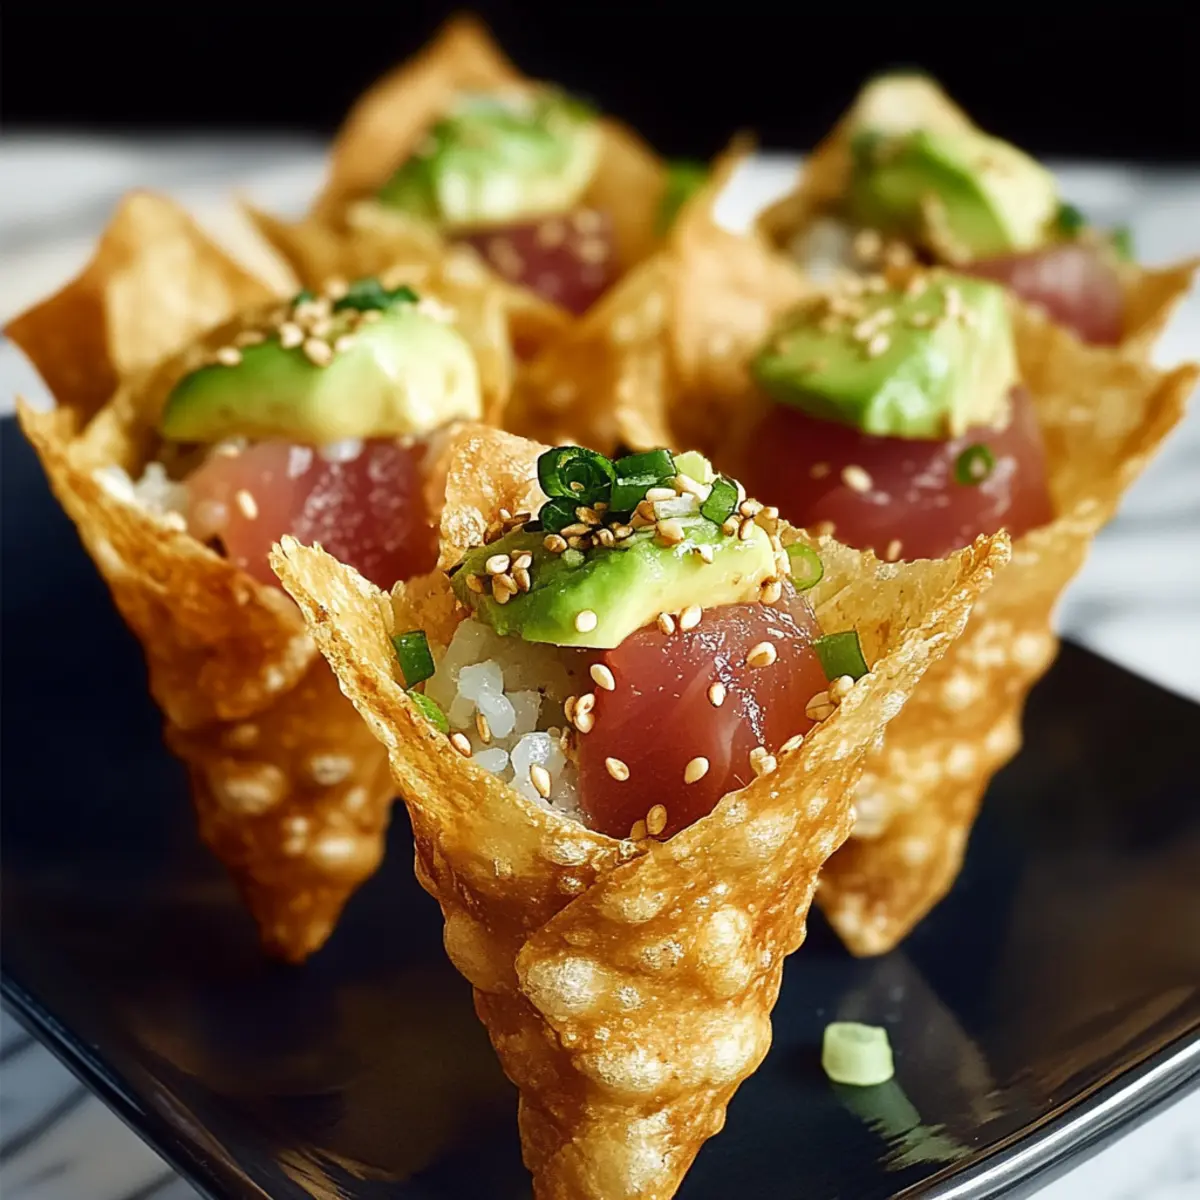
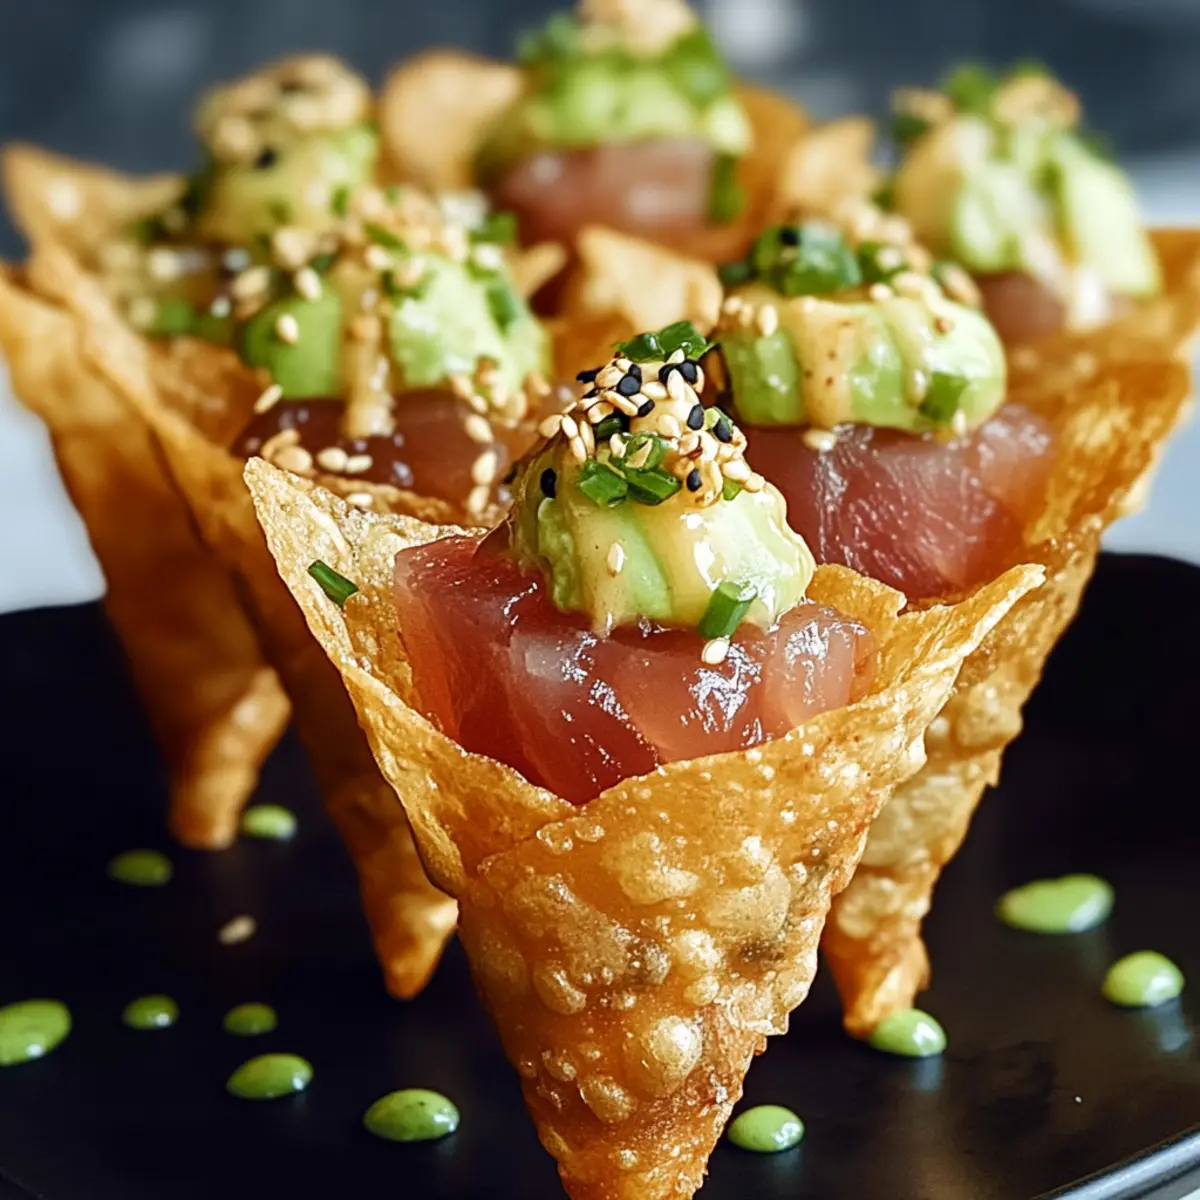
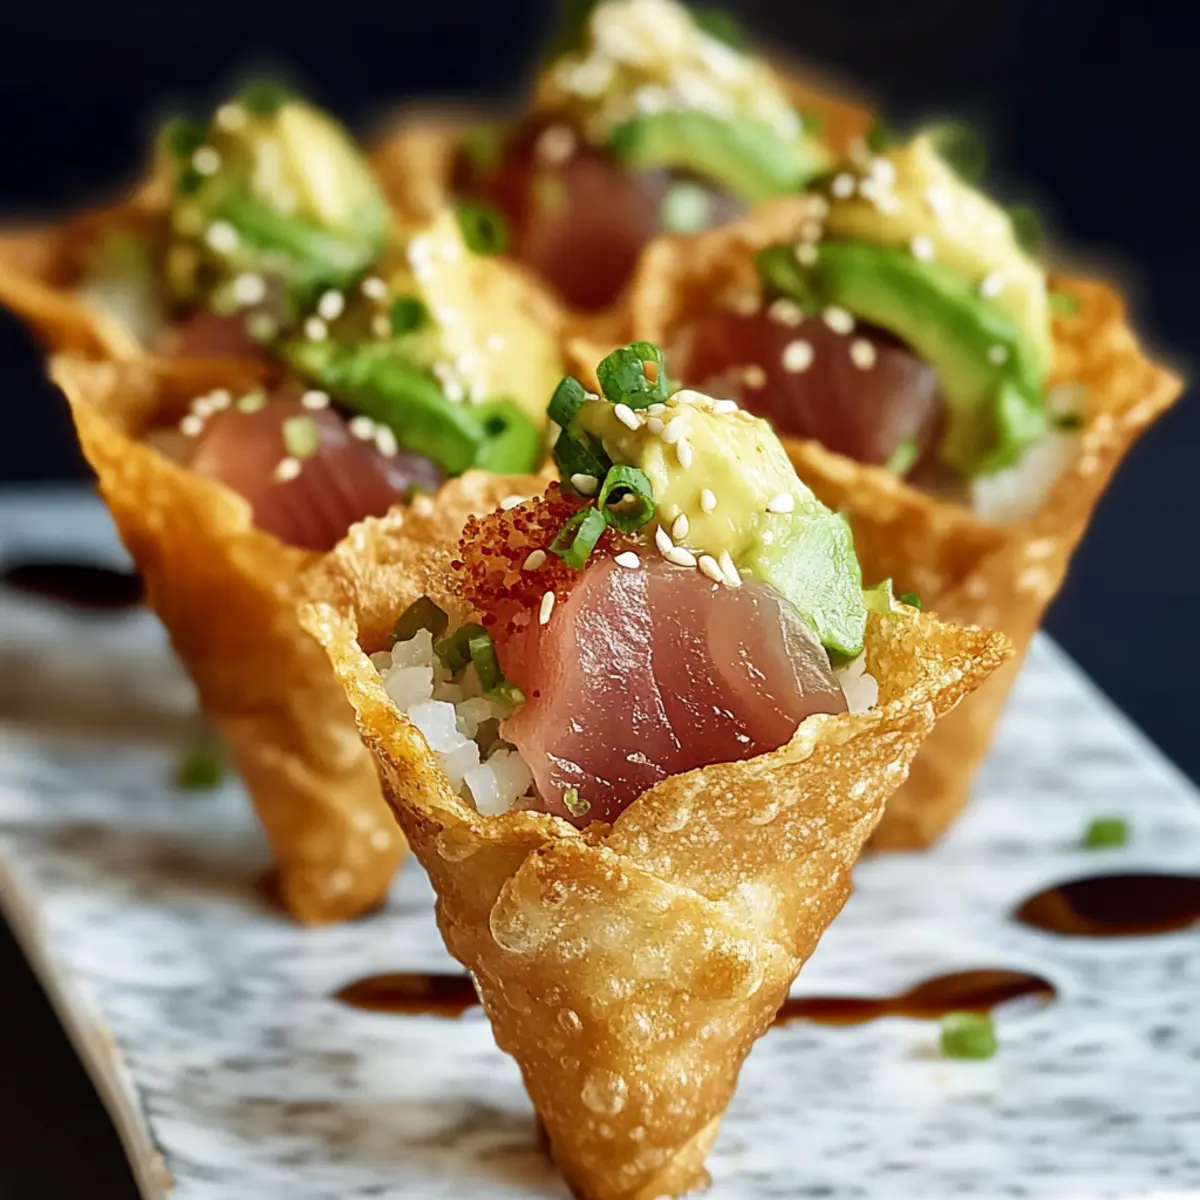
Now comes the fun part! Start layering each crispy wonton cone with a generous spoonful of sushi rice, followed by creamy avocado slices. Finally, add the spiced tuna mixture on top. Aim for a colorful presentation, allowing the vibrant ingredients to peek through the cones. Garnish with furikake or black sesame seeds for an extra pop of flavor and visual appeal.
Step 6: Serve and Enjoy
To keep your Creative Sushi Wonton Cones upright and looking stunning, place them in a mini muffin tin or a foam block. Serve immediately while the cones are still crisp, and enjoy the delightful combination of textures and flavors with each irresistible bite!
What to Serve with Creative Sushi Wonton Cones
Elevate your sushi experience by pairing these delightful cones with complementary sides that amplify the flavors and textures.
-
Refreshing Cucumber Salad: Light, crunchy cucumbers dressed in a tangy vinaigrette add a fresh contrast to the rich fillings. Their coolness offsets the savory bites wonderfully.
-
Miso Soup: A warm bowl of miso soup offers a comforting, umami-rich balance to your crispy cones. Sip between bites for a delightful flavor harmony!
-
Edamame with Sea Salt: A simple, yet satisfying snack, edamame pods enhance the dining experience with their nutty flavor and protein-packed goodness. Serve them warm for an inviting touch.
-
Spicy Pickled Vegetables: These tangy, fiery bites provide a zesty kick that invigorates the palate, perfectly complementing the savory elements of your sushi cones.
-
Asian-style Coleslaw: A crunchy slaw dressed in sesame-ginger vinaigrette adds a vibrant, crunchy texture alongside the cones. The color and flavor make for an uplifting addition to your spread.
-
Green Tea or Iced Matcha Latte: Refreshing drinks like green tea or a chilled matcha latte keep your meal light and invigorating, balancing the indulgence of the cones perfectly.
-
Coconut Sorbet: As a light dessert option, coconut sorbet serves a sweet, creamy finish while echoing the tropical notes found in sushi. It’s a refreshing way to round out your meal without heaviness.
How to Store and Freeze Creative Sushi Wonton Cones
Fridge: Store any leftover assembled cones in an airtight container in the fridge for up to 1 day. However, for the best texture, it’s advisable to keep the filling and cones separate until ready to eat.
Freezer: If you want to freeze unassembled cones, wrap them individually in plastic wrap and place them in a freezer bag for up to 1 month. Make sure to keep fillings separate to maintain freshness.
Reheating: For best results, reheat the fried cones in an oven at 175 °C (350 °F) for about 5 minutes to restore crispiness. Assemble with fresh fillings right before serving.
Make-Ahead Tips: Prepare the sushi rice and tuna mixture in advance and store them in the refrigerator. Assemble your Creative Sushi Wonton Cones just before serving to keep the cones crispy and delightful!
Creative Sushi Wonton Cones Variations
Get ready to make these delightful bites truly your own with some tasty twists!
-
Dairy-Free: Substitute Kewpie mayonnaise with a vegan mayo to keep your cones creamy and plant-based.
-
Spicy Kick: Add diced jalapeños or a drizzle of your favorite hot sauce to the tuna mixture for an extra flavor punch. Feel free to play with spice levels to find your perfect balance!
-
Vegetarian Twist: Replace tuna with marinated tofu or a medley of crunchy vegetables for a satisfying vegetarian option that’s just as fun to eat. Trying various combinations will keep your taste buds excited!
-
Quinoa Base: Swap sushi rice for cooked quinoa to add a nutty flavor and boost nutrition, making your cones a wholesome snack that feels a bit different yet familiar.
-
Tropical Burst: Mix in diced mango or pineapple with the avocado for a burst of sweetness that pairs beautifully with the savory elements. This twist adds a refreshing touch, perfect for summer gatherings.
-
Umami Boost: Incorporate some sliced shiitake mushrooms or sprinkle with extra furikake for a deeper umami flavor, making each bite a taste sensation.
-
Classic Shrimp: Use cooked shrimp in place of tuna for a delicious seafood alternative. You might want to toss the shrimp with a touch of lemon juice for added brightness.
-
Herbed Avocado: Mix fresh herbs like cilantro or basil into your avocado or substitute it with guacamole for that extra layer of flavor. This will transport your cones toward a whole new dimension!
Feel inspired to experiment? These serving suggestions can take your presentation to another level!
Expert Tips for Creative Sushi Wonton Cones
-
Correct Frying Temperature: Ensure your coconut oil is heated to 175 °C (350 °F) for perfectly crispy cones. If the oil is too hot, the cones may burn, so use a thermometer.
-
Chill Ingredients: Keep the sushi-grade tuna chilled until you’re ready to assemble. This helps preserve freshness and ensures your filling stays cool and delightful.
-
Prep Ahead: Prepare the sushi rice and tuna filling ahead of time and store them separately. Filling the cones just before serving will keep them crispy and prevent sogginess.
-
Experiment with Fillings: Don’t hesitate to get creative with your fillings! Try different proteins, like salmon or shrimp, and add colorful veggies to make your Creative Sushi Wonton Cones truly unique.
-
Use Fresh Ingredients: Fresh avocados and quality sushi-grade fish will elevate your cones, making them more flavorful and enjoyable for your guests.
Make Ahead Options
These Creative Sushi Wonton Cones are perfect for busy weeknights and meal prep enthusiasts! You can prepare the sushi rice and tuna mixture up to 3 days in advance. Simply cook and season the rice, then store it in an airtight container in the refrigerator. For the tuna, mix in the Kewpie mayonnaise and other ingredients, also refrigerating separately. To maintain the freshness and crispiness of the cones, it’s best to fry the wonton wrappers on the day of serving. When you’re ready to enjoy, simply fill the crispy cones with the prepped rice and tuna mixture, and you’ll have a delightful appetizer with minimal effort—just as delicious as when freshly made!
Creative Sushi Wonton Cones Recipe FAQs
How do I choose ripe avocados for my cones?
Absolutely! When selecting avocados, look for ones that are slightly soft but still firm when gently squeezed. If they have dark spots or feel overly mushy, they may be past their prime. If you’re not ready to use them immediately, choose firmer avocados and let them ripen at room temperature.
How should I store leftover cones?
To maintain the delightful crunch, store leftover assembled Creative Sushi Wonton Cones in an airtight container in the fridge for up to 1 day. However, it’s best to keep the fillings and cones separate until you’re ready to enjoy them again for optimal texture.
Can I freeze unassembled wonton cones?
Yes, you can! To freeze unassembled cones, wrap each one individually in plastic wrap and place them in a freezer bag. They will stay fresh for up to 1 month. Just make sure to keep fillings separate to avoid sogginess.
What if my wonton cones turn out too oily or soggy?
Very! If your cones are oily, try frying them at the correct temperature—175 °C (350 °F)—to ensure they crisp properly. If soggy, it’s essential to assemble with the rice and filling just before serving. This way, you maintain that delightful crunch!
Are there any dietary considerations I should be aware of?
Definitely! If you’re catering to dietary preferences, remember to use gluten-free rice paper instead of wonton wrappers for those with gluten sensitivities. For a vegan option, substitute the tuna with marinated tofu or additional veggies, and use silken tofu instead of avocado if desired.
What’s the best way to reheat leftover cones?
To reheat, preheat your oven to 175 °C (350 °F) and place the fried cones on a baking sheet for about 5 minutes. This will restore their crispiness beautifully. Assemble with fresh fillings immediately before serving for the best experience!
Enjoy whipping up these Creative Sushi Wonton Cones!
Creative Sushi Wonton Cones: Fun Bites for Any Occasion
Ingredients
Equipment
Method
- Step 1: Prepare Wonton Cones. Preheat your oven to 175 °C (350 °F). Wrap wonton wrappers around cream horn molds and seal edges with water.
- Step 2: Fry Cones. Heat coconut oil in a pan to 350 °F (175 °C). Fry wonton cones for 2-3 minutes until golden brown.
- Step 3: Make Sushi Rice. Cook sushi rice according to instructions. Mix in rice vinegar, sugar, and salt while warm.
- Step 4: Prepare Tuna Mixture. Mix chilled flaked or cubed tuna with Kewpie mayonnaise, ketchup, sriracha, and lime zest.
- Step 5: Assemble Cones. Fill each wonton cone with sushi rice, avocado slices, and the tuna mixture.
- Step 6: Serve and Enjoy. Place assembled cones in muffin tins or a foam block and serve immediately.
Leave a Reply