
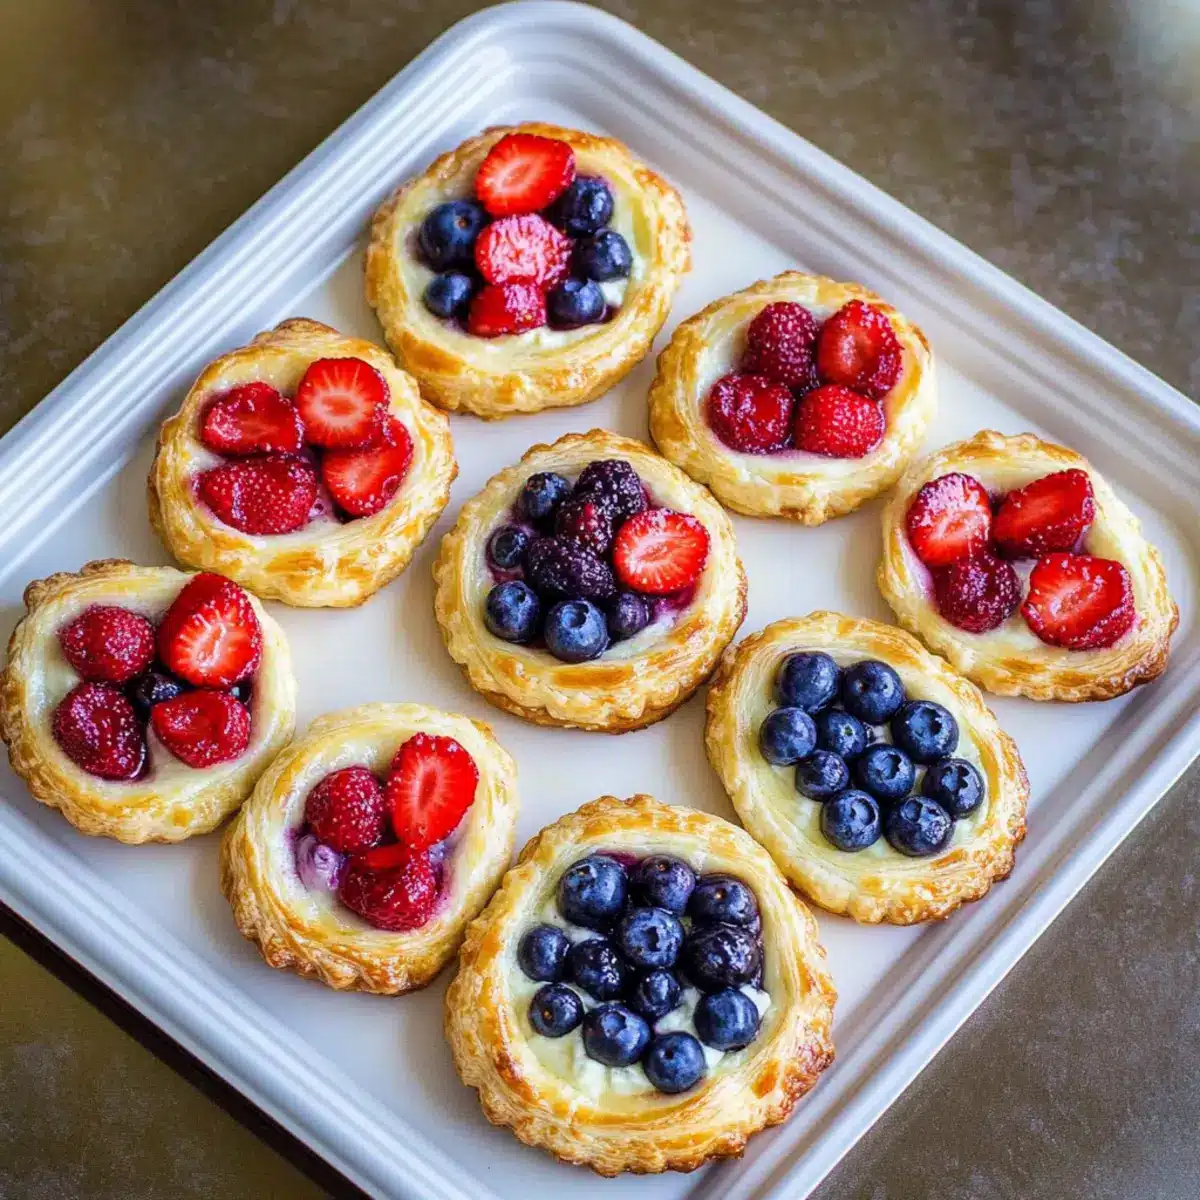
As the sun rises higher in the sky, you might find yourself reaching for that last bit of leftover takeout, but there’s a sweeter alternative waiting just minutes away! Allow me to introduce you to a delightful treat: the Fruit and Cream Cheese Danish Pastry. This 35-minute recipe transforms your breakfast or brunch into a vibrant celebration, featuring luscious blueberries and strawberries nestled in a flaky, golden pastry. One of the best perks? You can use store-bought puff pastry for a quick assembly or opt for homemade to impress your loved ones. Plus, these little delights not only satisfy your sweet tooth but also offer a delightful balance of creamy and fruity flavors. Whether you’re entertaining guests or simply treating yourself, these pastries are bound to make your mornings a little brighter. Ready to elevate your breakfast game? Let’s dive into the details!

Why Choose This Danish Pastry Recipe?
Quick, this delightful pastry comes together in just 35 minutes, making it perfect for those busy mornings. Versatile, feel free to swap fruits like raspberries or peaches to suit your taste. Crowd-pleaser, the combination of flaky pastry and creamy filling is sure to impress family and friends. Simple steps, whether using store-bought or homemade puff pastry, anyone can achieve bakery-level results at home. For a twist, don’t forget to check out the variation ideas to tailor these pastries to your liking!
Danish Pastry Ingredients
• Dive into the delightful world of Danish Pastry with these essential ingredients!
For the Pastry
- Puff Pastry Sheets – Provide the perfect flaky base; store-bought is a time-saver, while homemade packs a flavor punch.
- Melted Butter – Brushed on the edges for gorgeous golden color; olive oil can replace it for a healthier choice.
For the Cream Cheese Filling
- Cream Cheese – Adds rich creaminess; soften it for easy blending, or swap with mascarpone for a unique twist.
- Sour Cream – Brings tangy moisture to the mix; Greek yogurt can be a good substitute for a lighter option.
- Granulated Sugar – Sweetens your filling; adjust the amount based on your desired level of sweetness.
- Lime Juice & Zest – Brightens the filling with a fresh zing; lemon can be used as a substitute if needed.
- Vanilla Extract – Elevates the overall flavor; make sure to use pure vanilla for the best taste.
For the Topping
- Fresh Blueberries & Strawberries – Burst with natural sweetness and color; feel free to swap for other fruits like peaches or raspberries.
- Sanding Sugar – Provides a delightful crunch on top; can be omitted if unavailable or replaced with coarse sugar.
Step‑by‑Step Instructions for Quick & Easy Cream Cheese Danish Pastry with Fresh Fruit
Step 1: Preheat and Prepare
Begin by preheating your oven to 400°F (204°C). While the oven warms up, line a baking sheet with parchment paper to prevent sticking. This step is essential to ensure your Danish pastry gets that perfect golden finish.
Step 2: Roll Out Puff Pastry
On a floured surface, roll out your thawed puff pastry sheets until slightly flattened. Using a biscuit cutter, cut the pastry into rounds, ensuring they are evenly sized. This will form the delightful base for your fruit and cream cheese Danish pastries.
Step 3: Score the Edges
Carefully score the edges of each pastry round about half an inch inward, taking care not to cut all the way through the dough. Next, poke the centers with a fork to prevent them from puffing up too much during baking. This creates a lovely frame for the creamy filling.
Step 4: Mix the Cream Cheese Filling
In a medium bowl, combine softened cream cheese, sour cream, granulated sugar, lime juice, and lime zest. Use a hand mixer to beat the ingredients together until the mixture is smooth and creamy. The vibrant paste will add a wonderful richness to your Danish pastry.
Step 5: Assemble the Pastries
Spoon a generous dollop of the cream cheese mixture into the center of each puff pastry round, making sure to leave the scored border untouched. It’s important not to overfill them, as you want to maintain that beautiful shape while baking.
Step 6: Add the Fresh Fruit
Top half of the pastries with fresh blueberries and the other half with halved strawberries. Feel free to mix and match your fruits! This step not only adds flavor but also color, making your Danish pastries look irresistible.
Step 7: Brush and Sprinkle
Using a pastry brush, carefully brush the edges of each pastry with melted butter, which will help achieve that luscious golden color when baked. Next, sprinkle a bit of sanding sugar on top for a delightful crunch, adding a bit of sparkle to your pastries.
Step 8: Bake to Perfection
Place the prepared baking sheet in your preheated oven and bake the pastries for 15 to 16 minutes. Keep an eye on them; you’ll know they’re done when the edges turn a beautiful golden brown and the pastry puffs up nicely.
Step 9: Cool and Serve
Once baked, remove the Danish pastries from the oven and let them cool for a few minutes on a wire rack. This allows the creamy filling to settle. Optionally, garnish with extra lime zest before serving, enhancing both visual appeal and flavor for the perfect finishing touch.

Make Ahead Options
These Fruit and Cream Cheese Danish Pastries are perfect for meal prep, allowing you to savor a delightful treat even on the busiest mornings! You can prepare the cream cheese filling up to 24 hours in advance; store it in an airtight container in the refrigerator to maintain its creamy texture. If you’d like to assemble the pastries ahead, you can do so up to 3 hours before baking by filling the pastry rounds and placing them on a baking sheet covered with plastic wrap in the fridge. Just remember to brush on the melted butter and sprinkle with sanding sugar just before baking to ensure that golden finish. When you’re ready to impress, simply bake at 400°F for 15-16 minutes for freshly baked, restaurant-quality results with minimal effort!
Expert Tips for Danish Pastry
-
Room Temperature Cream Cheese: Ensure your cream cheese is at room temperature to achieve a smooth filling. Cold cream cheese can result in an unpleasant texture.
-
Don’t Overfill: Be mindful not to overfill your pastries. Leaving a border ensures they keep their lovely shape and puff nicely during baking.
-
Prick the Centers: Don’t skip poking the centers with a fork. This allows excess steam to escape and prevents the pastry from becoming too puffy.
-
Watch the Baking Time: Keep an eye on your pastries while baking. The perfect Danish pastry should be golden brown and puffy, but overbaking can lead to dryness.
-
Customize Your Toppings: Feel free to change up the fresh fruits! Different combinations will elevate the flavor of your Danish pastry, making them uniquely yours.
Danish Pastry Variations & Substitutions
Feel free to get creative with your Danish pastry, customizing it to your taste buds’ delight!
-
Berry Blend: Combine blueberries and raspberries for a colorful and flavorful twist that adds a tart zing.
Try mixing different berries to see what combination sings to you! -
Citrus Swap: Replace lime with fresh lemon juice and zest for a bright, zesty finish that complements the cream cheese beautifully.
Lemon brings a refreshing note that pairs wonderfully with any fruit filling. -
Dairy-Free Delight: Substitute cream cheese with a dairy-free cream cheese or silken tofu for a lighter option without losing creaminess.
This way, it remains indulgent while catering to those dairy-free diets! -
Peach Perfection: Replace strawberries with fresh peach slices for a sweet and juicy summer option that blooms with flavor.
Peaches add a lusciousness that takes these pastries to the next level! -
Mini Pastries: Cut smaller rounds from the puff pastry for bite-sized versions, making them perfect for parties or snacks.
These little treats pack all the flavor into a cute, shareable package! -
Spiced Sugar: Mix cinnamon or nutmeg with your sanding sugar for an aromatic, warm touch that enhances the pastry’s sweetness.
These warm spices transform your pastries from delightful to unforgettable! -
Nutty Addition: Add a sprinkle of chopped nuts such as almonds or pistachios on top before baking for an added crunch and flavor profile.
This extra layer of texture gives your Danish a unique twist everyone will love! -
Make it Savory: Experiment with a savory filling, such as goat cheese and sun-dried tomatoes, for a delightful appetizer experience.
A savory Danish opens up a world of flavors and is perfect for brunch gatherings or cocktail parties.
For even more inspiration, explore these sumptuous make-ahead tips or delve into how to store your pastries so they stay fresh!
Storage Tips for Danish Pastry
Fridge: Store the baked Danish pastries in an airtight container in the refrigerator for up to 5 days to maintain freshness.
Freezer: For longer storage, freeze the unbaked pastry assembled with filling and fruit. Wrap each pastry tightly in plastic wrap, then store in a freezer bag for up to 2 months.
Reheating: To enjoy the Danish pastry later, reheat in a preheated oven at 350°F (175°C) for about 10 minutes until warmed through, ensuring the pastry remains crispy.
Make-Ahead: You can prepare the cream cheese filling a day in advance, allowing you to assemble and bake fresh pastries whenever you need them.
What to Serve with Quick & Easy Cream Cheese Danish Pastry
Elevate your meal experience with delightful pairings that complement the rich, creamy flavors of your Danish pastry.
-
Fresh Fruit Salad: A vibrant mix of seasonal fruits adds a refreshing, juicy contrast that balances the pastry’s richness.
-
Greek Yogurt Parfait: The tartness of yogurt pairs wonderfully with the sweetness of the Danish, creating a creamy texture harmony.
-
Coffee or Tea: A warm cup of coffee or soothing tea enhances the pastry’s flavors while providing a comforting start to your day.
-
Crunchy Granola: Sprinkle some granola on the side for a delightful textural element that adds contrast to the soft pastry.
-
Honey Drizzle: A light drizzle of honey can amplify sweetness and create an irresistible synergy of flavors when enjoyed together.
-
Sweet Citrus Mimosa: The effervescence of a mimosa adds a festive touch, making your brunch feel extra special alongside these pastries.
Indulging in any of these delights will truly elevate your breakfast or brunch experience!

Fruit and Cream Cheese Danish Pastry Recipe FAQs
How do I select ripe fruit for my Danish pastry?
Absolutely! When choosing fruits like blueberries and strawberries, look for vibrant colors and firm, dry skins. Avoid any that have dark spots all over or feel mushy, as this could mean they’re overripe. Typical fresh berries are best when they are in season, ensuring maximum flavor. If you’re experimenting with peaches or other fruits, select those that yield slightly to gentle pressure, indicating they’re ripe yet firm enough to hold their shape during baking.
What’s the best way to store leftover Danish pastries?
Very! To keep your delicious Danish pastries fresh, store them in an airtight container in the refrigerator for up to 5 days. This way, they retain their flaky texture. If you’re really into prep, you can also freeze them! Just wrap the cooled baked pastries tightly in plastic wrap before placing them in a freezer bag—up to 3 months in the freezer is a great option.
Can I freeze unbaked Danish pastries, and how?
Yes, you can! To freeze unbaked Danish pastries, prepare them right before the baking stage. Once assembled, wrap each pastry individually in plastic wrap and place them in a freezer-safe container or bag. They can last up to 2 months in the freezer. When you’re ready to bake, simply take them out, let them thaw in the fridge overnight, and bake as directed—no need to thaw at room temperature!
What if my cream cheese mixture isn’t blending smoothly?
It happens! If your mixture isn’t blending well, often it means your cream cheese is too cold. To fix this, pop it in the microwave for about 10-15 seconds to soften it up before mixing. Alternatively, you can always use a hand mixer for a fluffy cream cheese filling. For a smoother consistency, start mixing the cream cheese alone first, then gradually add the remaining ingredients.
Are there any dietary considerations I should be aware of?
Indeed! If you’re serving these pastries to guests or family members with allergies, it’s good to know that this recipe contains dairy from both the cream cheese and sour cream. For those who are lactose intolerant or vegan, consider substituting with lactose-free cream cheese or a plant-based alternative. You could also add in dairy-free yogurt for the filling if you prefer a lighter texture.
Can I make the cream cheese filling in advance?
Absolutely! The cream cheese filling can be prepared a day ahead of time. Just store it in an airtight container in the refrigerator until you’re ready to assemble the pastries. This little save-ahead step adds convenience to your baking, letting you whip up delightful Danish pastries quickly whenever you have a craving or need a lovely treat for guests!
Delicious Danish Pastry with Cream Cheese & Fresh Fruits
Ingredients
Equipment
Method
- Preheat your oven to 400°F (204°C) and line a baking sheet with parchment paper.
- Roll out your puff pastry sheets until slightly flattened and cut into rounds.
- Score the edges of each pastry round and poke the centers with a fork.
- In a medium bowl, mix together cream cheese, sour cream, sugar, lime juice, and zest until smooth.
- Spoon the cream cheese mixture into the center of each puff pastry round.
- Top half of the pastries with fresh blueberries and the other half with halved strawberries.
- Brush the edges with melted butter and sprinkle with sanding sugar.
- Bake for 15 to 16 minutes until golden brown and puffed up.
- Remove from oven, cool on wire rack, and optionally garnish with extra lime zest.
Leave a Reply